Below is a comprehensive walkthrough for Dragon Wars. Since the game is an open world, the player can choose to visit any location they want (as long as they have access, and the abilities to survive). As that's the case, we have written a quick overview on how to complete the game, and then detailed individual areas (including maps). Choose a category below, or scroll down the page to begin your journey. Note: This walkthrough was created using the DOS version of Dragon Wars, which is very similar to the Amiga and Apple version. The Nintendo (NES) version is slightly different, so there may be some discrepencies (such as map locations, etc.).
Dragon Wars uses a skill based system - any time your characters advance a level, you decide how the characters advance and what skills impriove. The documentation that comes with the game advises that you spread the knowledge/skills around among your characters, which is also our recommended. There are many options and it is highly unlikely that you can make one character completely skilled (unless you play 24 hours a day, for a long time ... or cheat). Before distributing skill points, it is advised that you have one character concentrate on Lore (arcane, mountain, forest, etc) and another on the thiefly skills (pickpocket, lockpick, hide etc.). Get all the skills covered one way or another, but spread the "workload" over all your characters. I strongly advise having a character with a high bandage skill, as this character can heal characters, without wasting magical energy.
When a character advances a level, that character gets 2 points to apply to their skills/attributes. 2 points are not alot to work with, so it is often difficult to know how to spend these points. Many skills and attributes cost 1 or 2 points to raise the skill 1 point. Obtaining a new magic knowledge costs 10 points! By the end of the game, your character should be over the 10th level, which means they had 20 points to distribute throughtout the course of the game - considering the number of skills and attributes, and their costs, that isn't alot to work with.
Back to top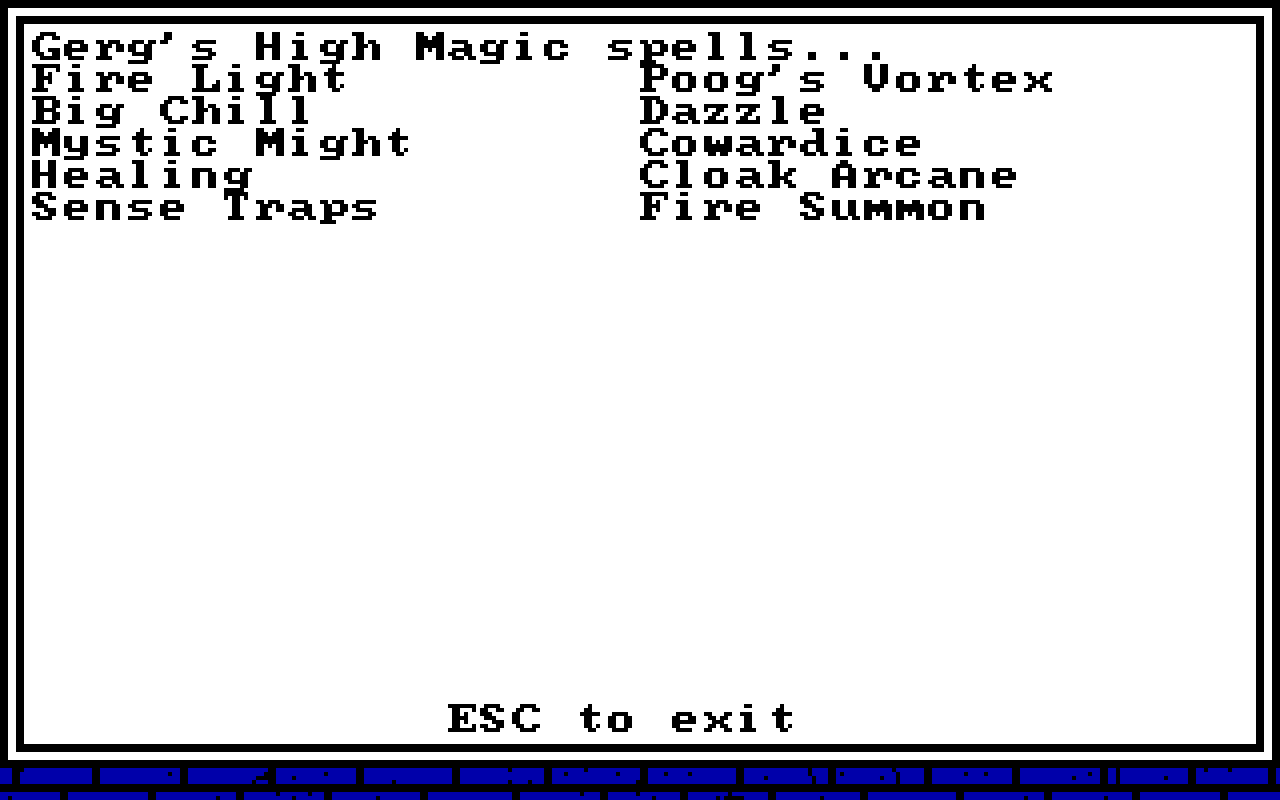
To cast spells you have to have magic power. Every time you cast a spell some magic power is drained. There are two ways to regenerate magic power. One is using Dragon Stones/Eyes. The other is to find a magic pool that restores energy (there are pools in Forlorn, Purgatory and the Magan Underworld). Dragon Stones restore 20 points of power and Dragon Eyes restore 30 points. Dragon Stones can be purchased in many locations throughout Dragon Wars for 250 gold, or they can be found as treasure. Dragon Eyes can only be found as treasure. Magic pools restore all magic points and have the added advantage of being free. . Make good use of these pools to restore your magician's power and allow you to heal your characters as you explore the land.
Back to top
Inventory in Dragon Wars can be frustrating. Your characters can only carry a certain number of items (regardless of weight). This limited "space" can cause a problem, as inventory fills up fast. Dragon Wars does not provide any means of storing items in a location for use later. To further complicate matters, some treasure chests that you find will disappear after you have opened them (hence, the treasure disappears when you leave). Certain items found in treasures are unique and needed to solve the game, but disappear if you don't pick them up at that time (not allowing you to finish the game). It is not always clear which items are important and which are not. I managed to avoid problem related to inventory in my own game, but it is worth noting so that you manage your own character's inventory with care.
Examination of an item tells you what strength or dexterity or skill is needed to use it. Examination does not tell you the kind of damage the weapon is capable of inflicting, nor what spells can be cast by the item. To get a rough idea of the powerful a weapon is, look at SELL value. The more valuable an item, the more powerful it is. Some weapons/items can cast certain spells and can be very useful (as you can cast a spell without wasting magical energy). Some of these "magic" items are worth keeping in your inventory, but in general don't carry around a lot of items for which you have no real use. Sell extra weapons and item for money. Note: items sold in stores disappear after sale. You can't return to the shop later to buy the item back.
Back to topIn Dragon Wars, there are many puzzles. Few are *absolutely* essential to the game, but some give you powerful items that may help improve your party more quickly than a lot of fighting could. Here is a list of absolutely essential tasks in order to complete the game:
Prior to visiting Salvation it is a good idea to spend some time in the Magan Underworld near the energy pool that restores magic power - healing characters and recharging magic items. Of particular use are Healing Potions, Battle Wand (battle power), Dragon Horn (rage of mithras), and the Speed Wand (zak's speed). You may choose to carry others at this point, but the above will make your final fights much easier. The maximum charges you can boost in any item is 49. It will take some time to charge all the items, but setting up a macro will make this easier and is certainly worth the time and effort. If you have already visited Salvation and taken the treasure there, be certain to stock up on DRAGON STONES before entering the end game. Clear out of your inventory of anything that you do not need so that you can carry more dragon stones.
Back to topThis section details all areas of the game. As the game is open-ended, players are meant to explore anywhere they want, and there is no straight path to completion. If you are looking for a more in-depth walkthrough, I suggest you read the entries on Purgatory and the Magan Underworld first, and finish with the entries for Salvation and Nisir.
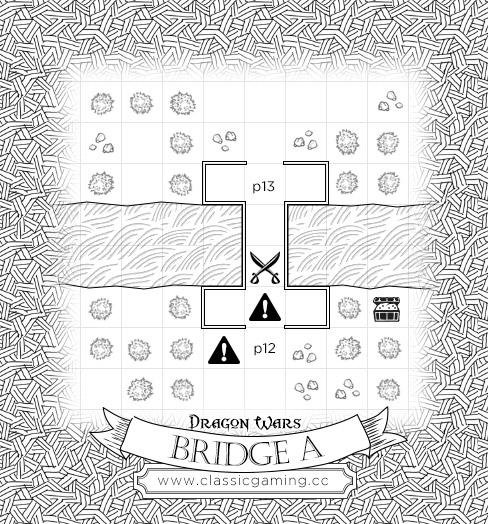
Back to topThis is the first bridge you cross in the game. A guard will stop and ask for citizen's papers. Show the papers to pass easily. If you do not show the papers, nothing will happen immediately. However, if you don't show papers and then try to cross the bridge, you will be attacked.
Back to top
A group of Pikemen will ask to search your packs. If you allowed, they will ask for a percentage in gold of what you are carrying in order to allow you to pass. Refusal to pay results in an encounter with 3 pikemen. This is not a difficult encounter and better than paying the fee.
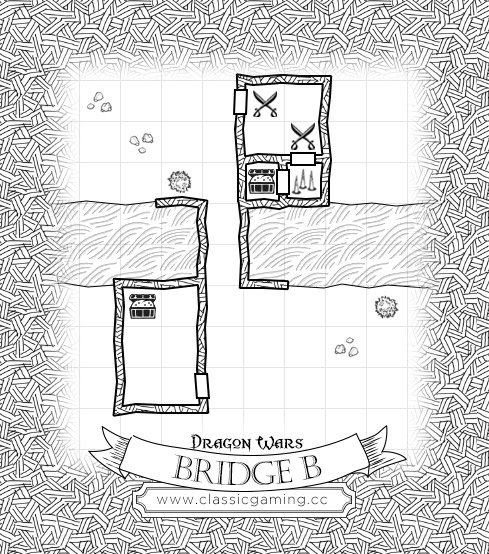
This bridge contains an Armory. Enter the building once will get your party thrown out. Entering twice will cause the guards to attack. Successfully defeating the guards allows you to reach the armory (there is a pit in the room before it which will cause damage to your party) and obtain the following:
| Item | Req. / Power |
| Axe of Kalah | Str 18 |
| Holy Mace | Exorcism, Str 12 |
| Gem Helm | |
| Guantlets | |
| Archers' Bow | Dex 18 |
| Boomerang | |
| Dragon Stones (10) |
You need the Governor's Pass to cross this bridge. The pass is obtainable in either Lansk (tedious) or Lansk Undercity (easy purchase).
Back to topParagraphs: 33, 34
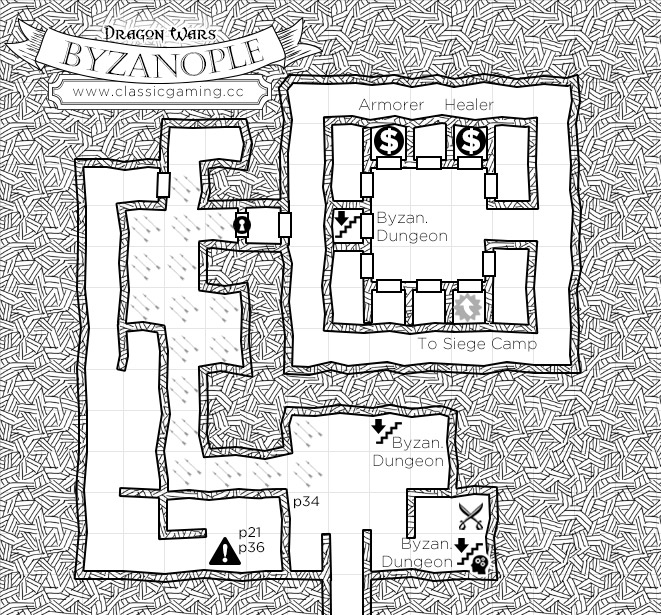
Located on King's Island, Byzanople is only accessable from the Siege Camp. As you enter this area for the first time, you will be outside the city walls. If you get too close, you will be fired upon by the city guards (you ARE coming from the Siege Camp). Directly north and one square east of where you enter are stairs leading down. Alternately, there is also an entrance in the southeastern area. Here you will need to move a rock (strength) to reveal an opening (Strength check - use your strongest character). Both lead you to the Byzan Dungeon. You will not obtain access to Byzanople proper until after you have completed Byzan Dungeon. In the city there is a healer, an armorer and a blacksmith:
| Item | Cost |
| Scale | 250 |
| Chain | 310 |
| Plate | 3100 |
| Large Shield | 1000 |
| Dragon Stone | 250 |
| Item | Cost | Req./Power |
| War Flail | 500 | Str 10 |
| Bladed Flail | 1000 | Str 10 |
| Mace | 50 | Str 10 |
| Dagger | 30 | Str 3 |
| Short Sword | 50 | Str 8 |
| Broadsword | 60 | Str 12 |
| Polearm | 90 | Str 13 |
| Long Mace | 2000 | Str 15,can melee at 20' |
| Bow | 60 | Dex 10 |
| Long Bow | 90 | Dex 14 |
| Crossbow | 60 | Dex 12 |
| Bolt (20) | 60 | |
| Arrow (20) | 50 | |
| Javelin | 40 | Dex 12 |
| Barbed Spear | 4000 | Dex 16 |
Paragraphs: 108, 110
Accessable from Byzanople
| Item/Spell | School |
| Magic Chain | |
| Magic Shield | |
| Big Chill | High Magic |
| Dazzle | High Magic |
| Long Bolt (20) | |
| Dragon Stones (7) |
On the west side there is a door leading into the ancient crypt. There are many zombies encounters in this area. In the southwest corner is a treasure:
| Item | Req. |
| Magic Axe | Str 20 |
After exploring this area, take the stairs up. Jordan will tell you that it is now time to attack the Siege Camp and you will be moved to an area outside the Siege Camp walls.
Back to top(See Snake Pit)
Back to topDilmun refers to all the islands of Dragon Wars - King's Island, Rustic, Isle of the Sun, Forlorn, and Quag, as well as some areas that are not shown on the map in the documentation. See appropriate notes for more information.
Back to topParagraphs: 120, 134
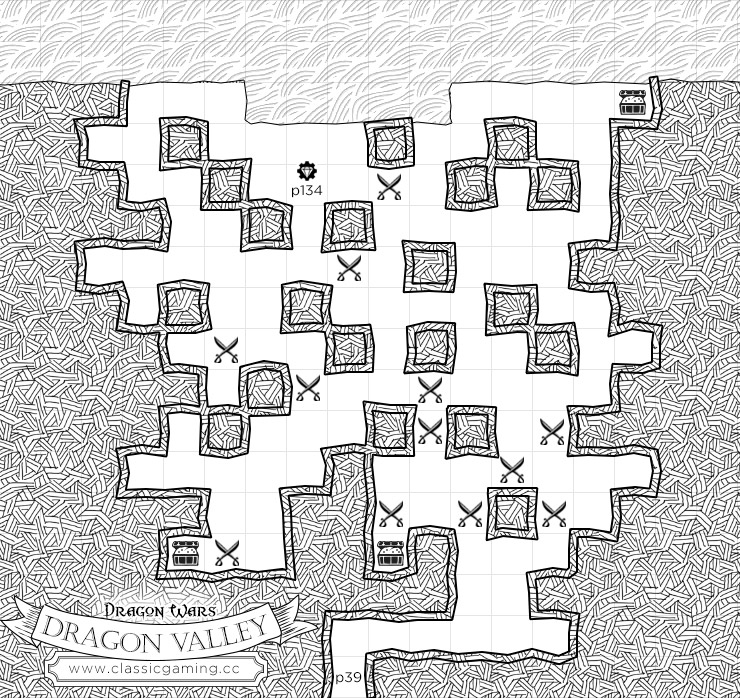
Accessable only from Eastern Isles (Sunken Ruins) with the ship from Smuggler's Cove. This is a dangerous place to explore, and in order to get past the Dragon Queen, you need the Dragon Gem (obtained from the Lansk Dragon, using the Anhk). In the south of this area, you will find a Dragons Tooth (a sword, you can pick up as many as you wish). On the southwest you will find a Dragons Nest:
| Item | |
| Dragon Tears | |
| Holy Lance | Str 13 |
| Dragon Helm | |
| Dragon Shield | |
| Dragon Eye |
In the northeast corner you will find a treasure:
| Spell | School |
| Sala's Swift | High Magic |
| Vorn's Guard | High Magic |
| Cowardice | High Magic |
Also in the northwest area of Dragon Valley is an encounter with the Queen Dragon. She will threaten you and when there is a pause (and you have access to your inventory), use the DRAGON GEM (from the Lansk Dragon) to escape death. You can recieve the Dragon Gem from the Lansk Dragon in Lansk Undercity (behind the secret passage) - just use the Anhk when you are near the dragon.
Paragraphs: 38, 118, 119
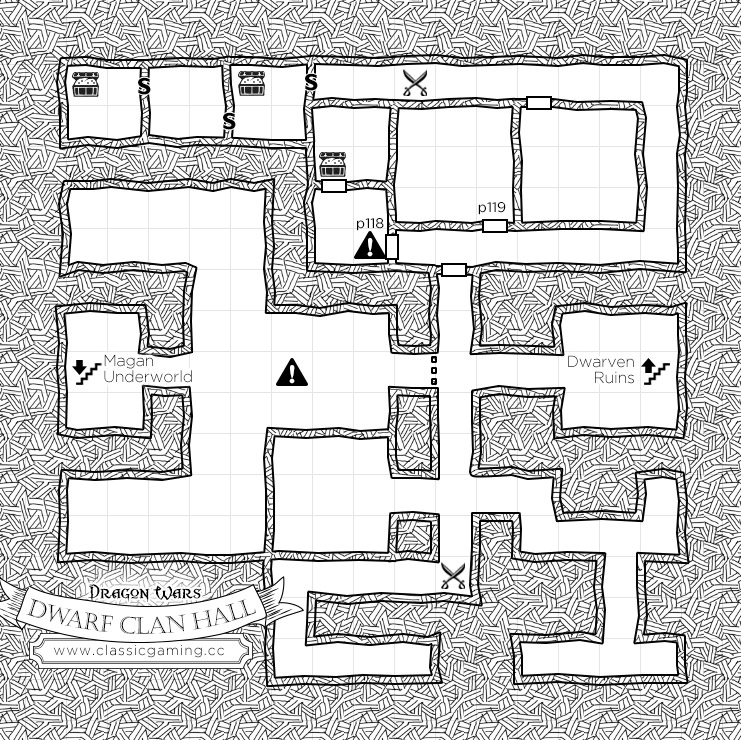
The western most part of this area can be reached from the Magan Underworld. The easter portion of this area can be reached from the Dwarf Ruins (if you have the Jade Eyes from the pirates at Smuggler's Cove). Each area is separated from the other by an invisible barrier, which cannot be passed. However, if you wish to go around the crystal barrier, feel free to use Soften Stone to take down some walls.
On your first entry to the western portion of the hall, you should find a forge and little else. If you have access to the eastern portion, you will find a room of dwarf statues. Use Soften Stone on the statues to bring back the petrified dwarfs. Once the dwarfs are "awake" again, you will find that there is now a smith at the forge (in the western portion). If you have Roba's Skull, give the skull to the dwarf and he will start work in the Sword of Freedom. He will tell you that it will be waiting for you on the Isle of Woe in the Magan Underground.
There are 3 treasures to be found in the Dwarf Clan Hall. The treasures are guarded by Automans which are fairly difficult to defeat.
| Item/Spell | School |
| Dragon Helm | |
| Bomb (8) | |
| Zak's Speed | Misc Magic |
| Mystic Might | High Magic |
| Item | Req. |
| Crush Mace | Str 15 |
| Spell Staff | |
| Healing Potion |
| Item | Power |
| 1000 gold | |
| Dragon Horn | Rage of Mithras |
Located in the central area of King's Island there is little here except a statue and a small building. Use the JADE EYES (obtained from the encounter with the pirates in Smuggler's Cove) on the statue to open the small building. This will give you access to stairs leading down to the eastern side of the Dwarf Clan Hall.
Back to topParagraphs: 46
These islands are part of Dilmun and accessable using the ship from Smuggler's Cove. This area contains the entrances to the Sunken Ruins and Dragon Valley.
Back to topThis area of Dilmun contains Purgatory, Slave Estate, Tars Ruins, the Slave Camp and a weapons cache. The treasure is located almost due south of the Slave Estate. The southern most section of this land mass has a magical pool which will restore heal and magic to maximum.
| Item | School / Req. |
| Chain Armor | |
| Broadsword (2) | Str 12 |
| Hand Axe | Str 5 |
| Brigadine (2) | |
| Bow | Dex 10 |
| Arrow (2x20) | |
| Mage Fire | Low Magic |
| Charm | Low Magic |
| Luck | Low Magic |
| Lesser Heal | Low Magic |
| Mage Lite | Low Magic |
| Dragon Stone (4) |
Paragraphs: 27, 51, 52, 56, 57
Accessable only with the pirates ship from Smuggler's Cove. This city contains numerous shops.
| Item | Cost |
| Scale | 250 |
| Chain | 310 |
| Heavy Plate | 4000 |
| Lg. Shield | 100 |
| Item/Spell | School | Cost |
| Dazzle | High Magic | 1000 |
| Mystic Might | High Magic | 1000 |
| Reveal Glamour | High Magic | 1000 |
| Sala's Swift | High Magic | 1000 |
| Vorn's Guard | High Magic | 1000 |
| Cowardice | High Magic | 1000 |
| Soften Stone | Druid Magic | 1000 |
| Item/Spell | Cost | Req. |
| Bladed Flail | 1000 | Str 10 |
| Hammer | 40 | Str 10 |
| Long Mace | 200 | Str 15 |
| Item | Cost |
| Dragon Stone | 250 |
On the east side of the city you will find the Order of the Sword. An encounter here will give you the following treasure:
| Item/Spell | School |
| Stone Hand | |
| Soften Stone | Druid Magic |
| Spell Staff | |
| Charger | Sun Magic |
At the Brew Brother's you will find the volunteer Halifax who is a better addition to your group than Louie (found in the Slave Camp). In the southwest portion of the city is an island which you can reach using the Golden Boots obtained in Mud Toad. Upon the island is what seems to be the "freedom sword". Cast Reveal Glamour to show that this is really a trap set by Namtar. If you decide to try and pick up the sword, one of your characters will die.
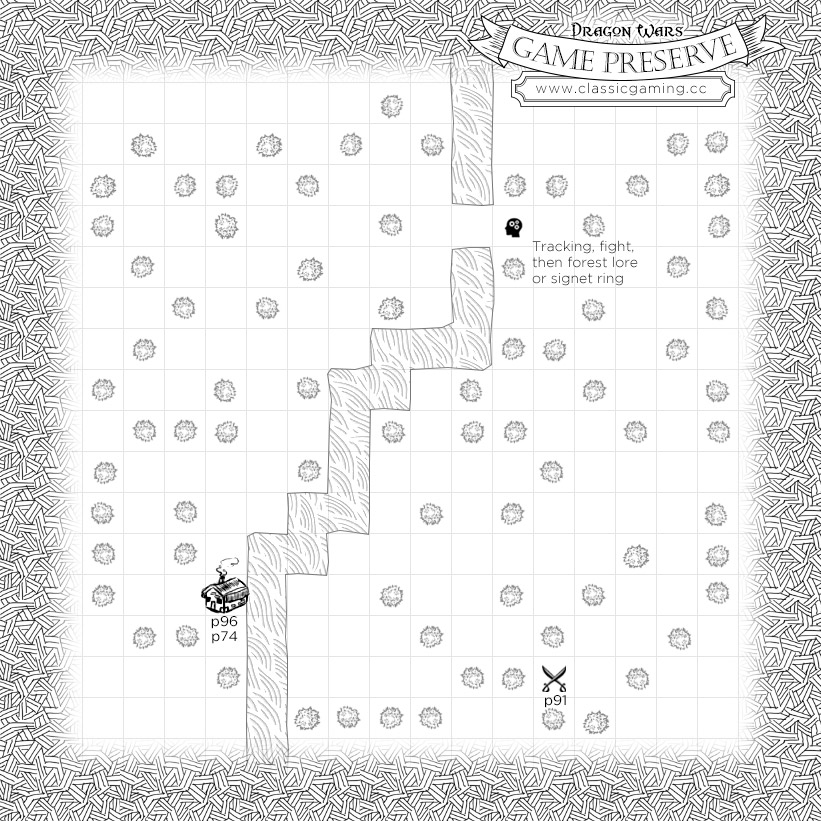
Back to topParagraphs: 74, 91, 96
Accessable from Rustic, the Game Preserve is located on the northwest section of Rustic. There are many snare traps in the area, but are easily removed (should you get caught) with the use of any weapon. In the southwest, near the river, is the home of the Game Keeper. Use the Signet Ring (obtained in Snake Pit) and he will give you a MAGIC BOW. On the southeast is a treasure:
| Item/Spell | School |
| Magic Arrow | |
| Battle Power | Sun Magic |
| Fire Column | Sun Magic |
This area of Dilmun includes the city of Phoebus and an entrance to the Mystic Forest. Bridges connect this area with Forlorn and the portion of Dilmun that holds the city of Lansk.
Back to topThis portion of Dilmun contains Kingshome, Byzanople, Siege Camp, Nexus to Mystic Forest, Old Dock, Old Bridge, Ruins and a Decaying City . Encounters on this island are too rough for beginning characters. There is also an Ambush area on the northeast coast which will result in you being thrown into the dungeon under Kingshome.
Back to topParagraphs: 130, 131
Accessable from the Kingshome Dungeon (once only) and from King's Island (if you have the Signet Ring, see Snake Pit). If you came up from the dungeon you will have a peaceful encounter with Namtar in the north central area of the castle. Exiting his room will cause the door to disappear forever. Doors in the north will lead you into the wall area, surrounding the castle. On the west side is a gallery and a closet full of Pilgrim's Garb (needed to take Pilgrim's Ferry to Nisir). On the east side is a treasure and a library of rare books.
| Item | Power / Req. |
| Polearm | Str 13 |
| Royal Robe | |
| Rare Books | |
| Boomerang | Dex 12 |
| Lucky Boots | |
| Magic Chain | |
| Rusty Axe | Str 18 |
This treasure chest will disappear when you leave whether you took everything or not. The exit to King's Island is in the center of the south wall.
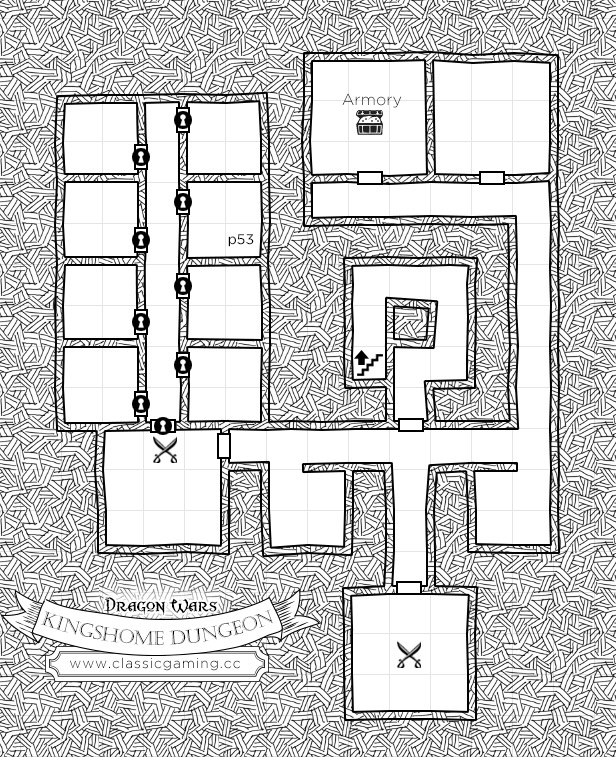
Back to topParagraphs: 53, 65
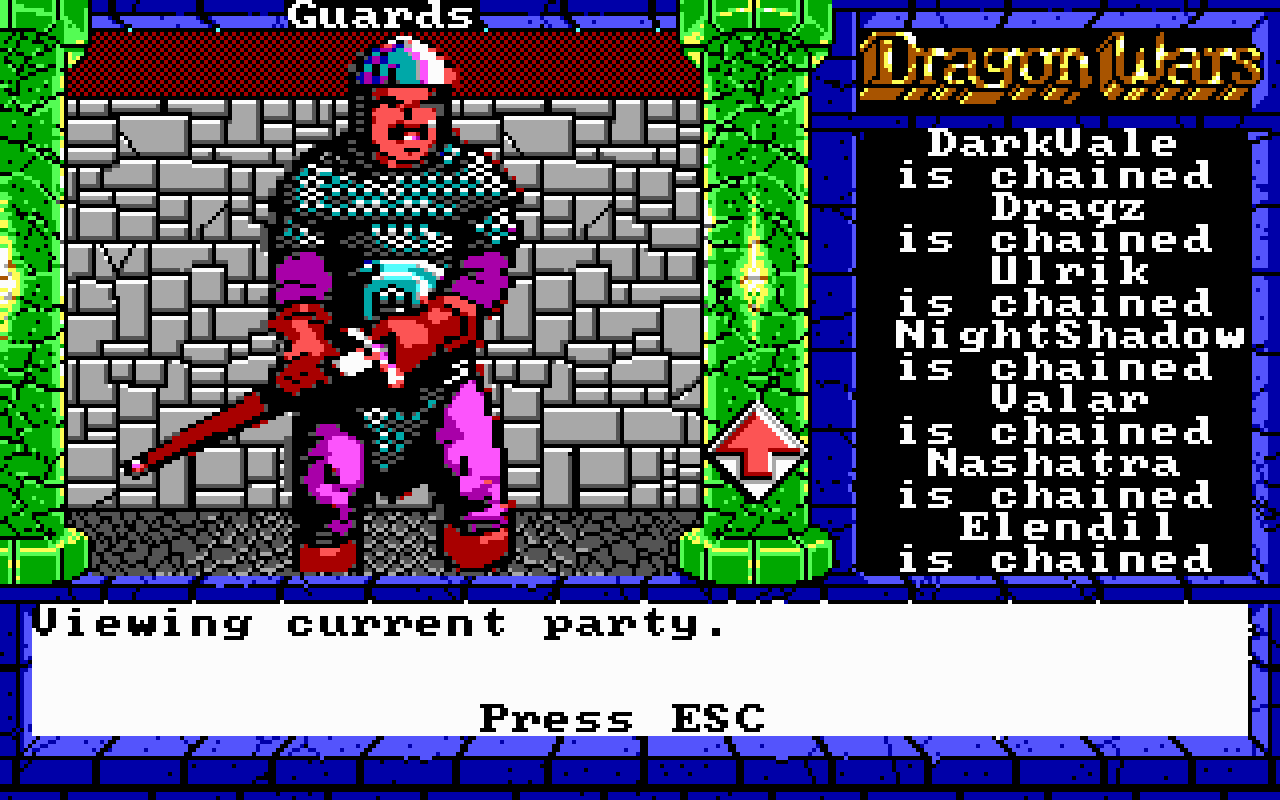
Accessable by being ambushed in the northeast of King's Island, in Dilmun. Not for beginning characters - be prepared. You will not be able to return here once you leave. You will find your group in a prison cell which is not locked. To the south are guards just waiting to beat you up. Pending survival, to the east is a door that leads to stairs going up. Don't take them until you have continued all the way east and north to the last door in the hallway. There are some big encounters here, but this last room contains the King's armory:
| Item | Power |
| Black Helm | Zak's Speed |
| Fire Shield | |
| Grey Arrow (20) | |
| Gatlin Bow | 10 Dex |
| Throw Mace | Str 18 |
| Mage Ring | Low magic 3 needed to use |
| Magic Axe | Str 20 |
| Dragon Stones (20) |
After collecting this treasure, return to the stairs which will take you up to Kingshome Castle.
Back to topParagraphs: 107
Accessable only after restoring Lanac's statue in Mud Toad. You will need the soften stone spell to successfully complete this area. The map wraps upon itself - so if you start at one point, go straight east, eventually you will return to your start point. To the northeast of your point of entry, through several walls, is a large room in which three treasures can be found:
| Item | Power |
| Healing Potion | |
| Battle Wand | Battle Power |
| Dragon Shield |
| Spell | School |
| Fire Storm | Sun Magic |
| Zak's Speed | Misc Magic |
| Kill Ray | Misc Magic |
| Mage Fire | Low Magic |
| Dazzle | High Magic |
| Sun Stroke | Sun Magic |
| Item | Power |
| Lanac's Spectacles | Needed to gain access to the Magic College |
To the northwest of point of entry is an entrance to the Magan Underworld. It is a one way trip.
Back to topParagraphs: 35, 64
Accessable from Dilmun or the Lansk Undercity, this city is a bureaucratic nightmare. The officials here will have you running all over the city to get paper work done.
To get the Govenor's Pass, which allows you to cross the next bridge, go to the Visitors Registration Department - they will tell you about the city. Then go to the Govenors Office (one door down) to get some papers. Bring the papers to the Visitors Information Bureau (ignore the govenor who tells you to go to the Office of Interior Affairs)and you will be given the Govenor's Pass.
To access Lansk Undercity, go to the Department of Lubrication and use the Bureacracy skill. Bribe the official a nice sum (i.e. 500 gold), and he will open the stairs to the undecity.
There is one treasure to be found on the west side of the city.
| Item | Power, Req. |
| Druid Mace | Cure All, Str 12 |
In the northeast area of the city, you will learn in the Quarter Masters Office, Mog (the owner of the Slave Estate) has passed away and left his estate to you. An odd point in the game, as it is unknown why Mog left the estate to you. Even if you were not one of his slaves (sold through Purgatory). Perhaps Mog heard of your mighty exploits and favored you.
Encounters in this city are nasty for beginning characters, if not impossible. They can and should be avoided until later in the game.
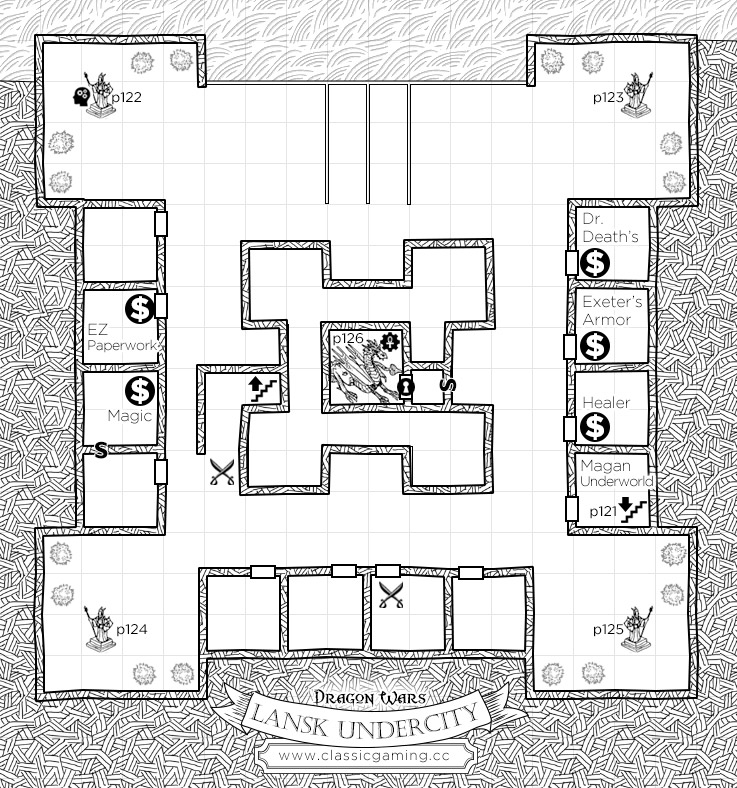
Back to topParagraphs: 121, 122, 123, 124, 125, 126
Accessable to the Magan Underworld, or through Lansk (provided you bribe an official in the city, who will open access to the stairs). Encounters here are rough for new and middle characters, but you can do a lot of exploring here if you are careful. There are four shops and a healer in this area. The armorer, weapon and healer are all on the east side of this area. EZ paperwork and the Magic shop are on the west. The magic shop is located through a secret passage which is easily found.
| Item | Cost |
| Cloth | 25 |
| Leather | 50 |
| Brigadine | 80 |
| Scale | 250 |
| Chain | 310 |
| Plate | 3100 |
| Shield | 1000 |
| Large Shield | 1000 |
| Item | Cost |
| Broadsword | 60 |
| Greatsword | 80 |
| Bow | 60 |
| Longbow | 90 |
| Crossbow | 60 |
| Arrow (20) | 50 |
| Bolt (20) | 60 |
| Javelin | 40 |
| Item | Cost |
| Governors Pass | 200 |
| King's Ticket | 50 |
| Citizen's Papers | 100 |
| Item/Spell | School | Cost |
| Create Wall | Druid magic | 100 |
| Wood Spirit | Druid magic | 100 |
| Cure All | Druid magic | 100 |
| Dragon Stones | 250 |
Paperwork: The Governors Pass is needed to cross a bridge between Quag and Lansk. The Kings Ticket is needed to take the ferry. The Citizen Papers are needed to cross the bridge between the Isle of the Sun and Forlorn.
On the north of this area is a ferry to Kings Island. Use the Kings Ticket for passage (not recommended for early characters). In the center of this area is a harmless dragon. To access the dragon's area, you must use a secret passage on the east side of the center building. Rumors you will hear elsewhere will hint that the Lansk Dragon conceals a gem. To get the gem you will need to use an Anhk (which can be purchased in Mud Toad). On the west side of this center building are stairs leading up to the city of Lansk. They go up, but they do NOT come back down (unless you have bribed the city official). Go this way only if you have saved your game and are certain that you wish to.
The north west statue can be moved using strength to reveal a locked chest which contains the "glow sword" (2-handed sword that requires a strength of 24 to use) and 12 "dragon stone".
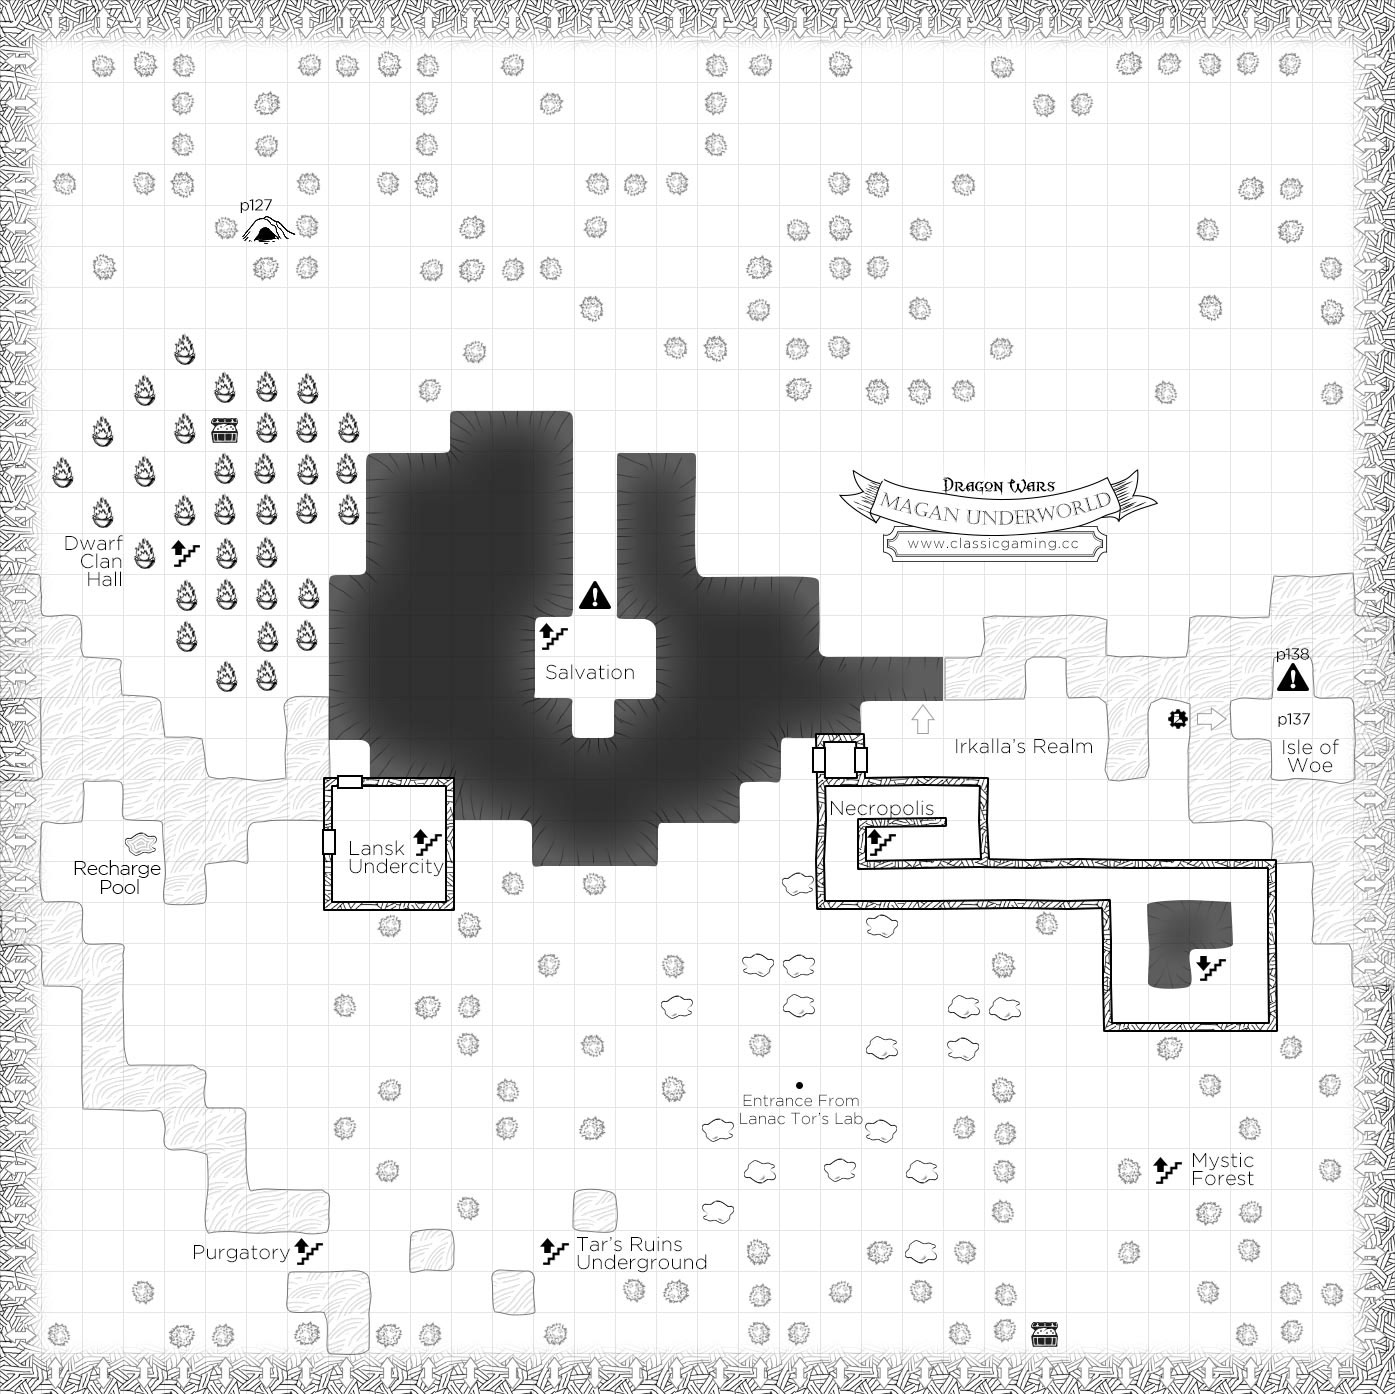
Back to topParagraphs: 127, 137, 138
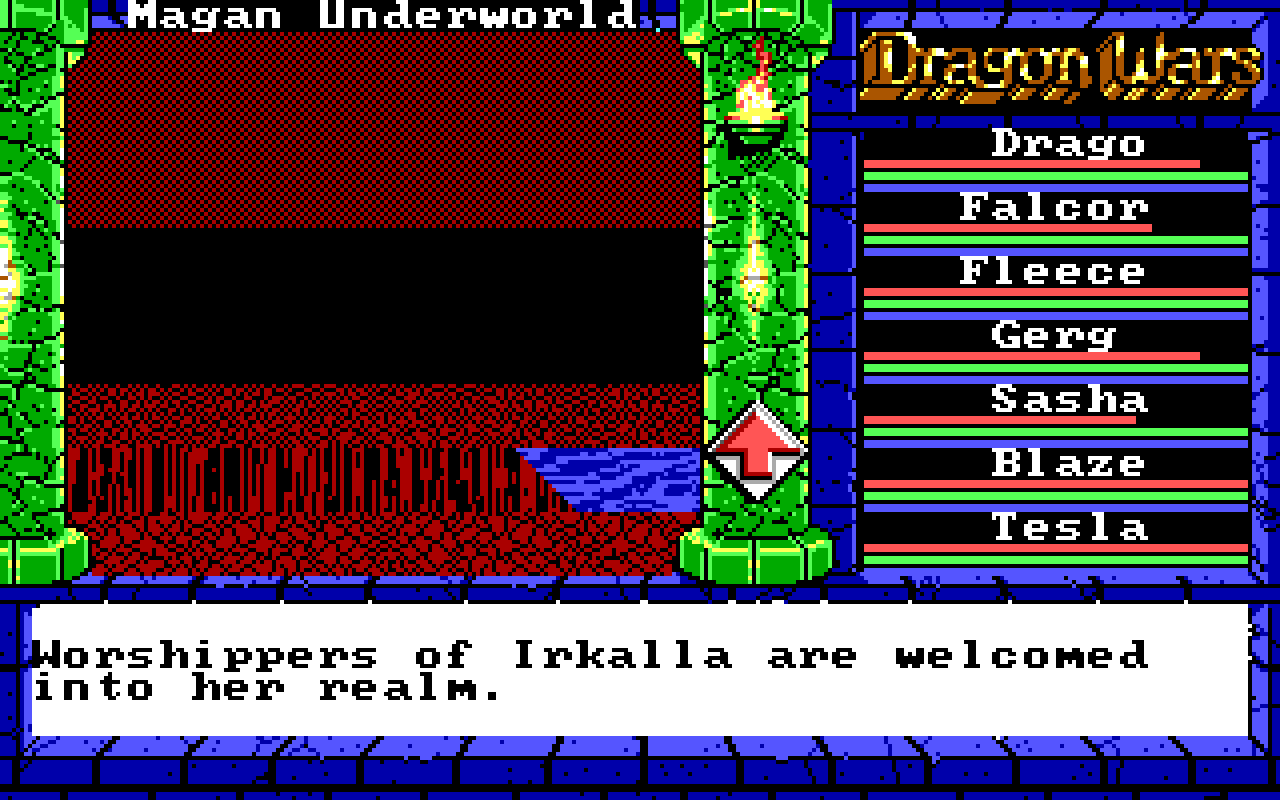
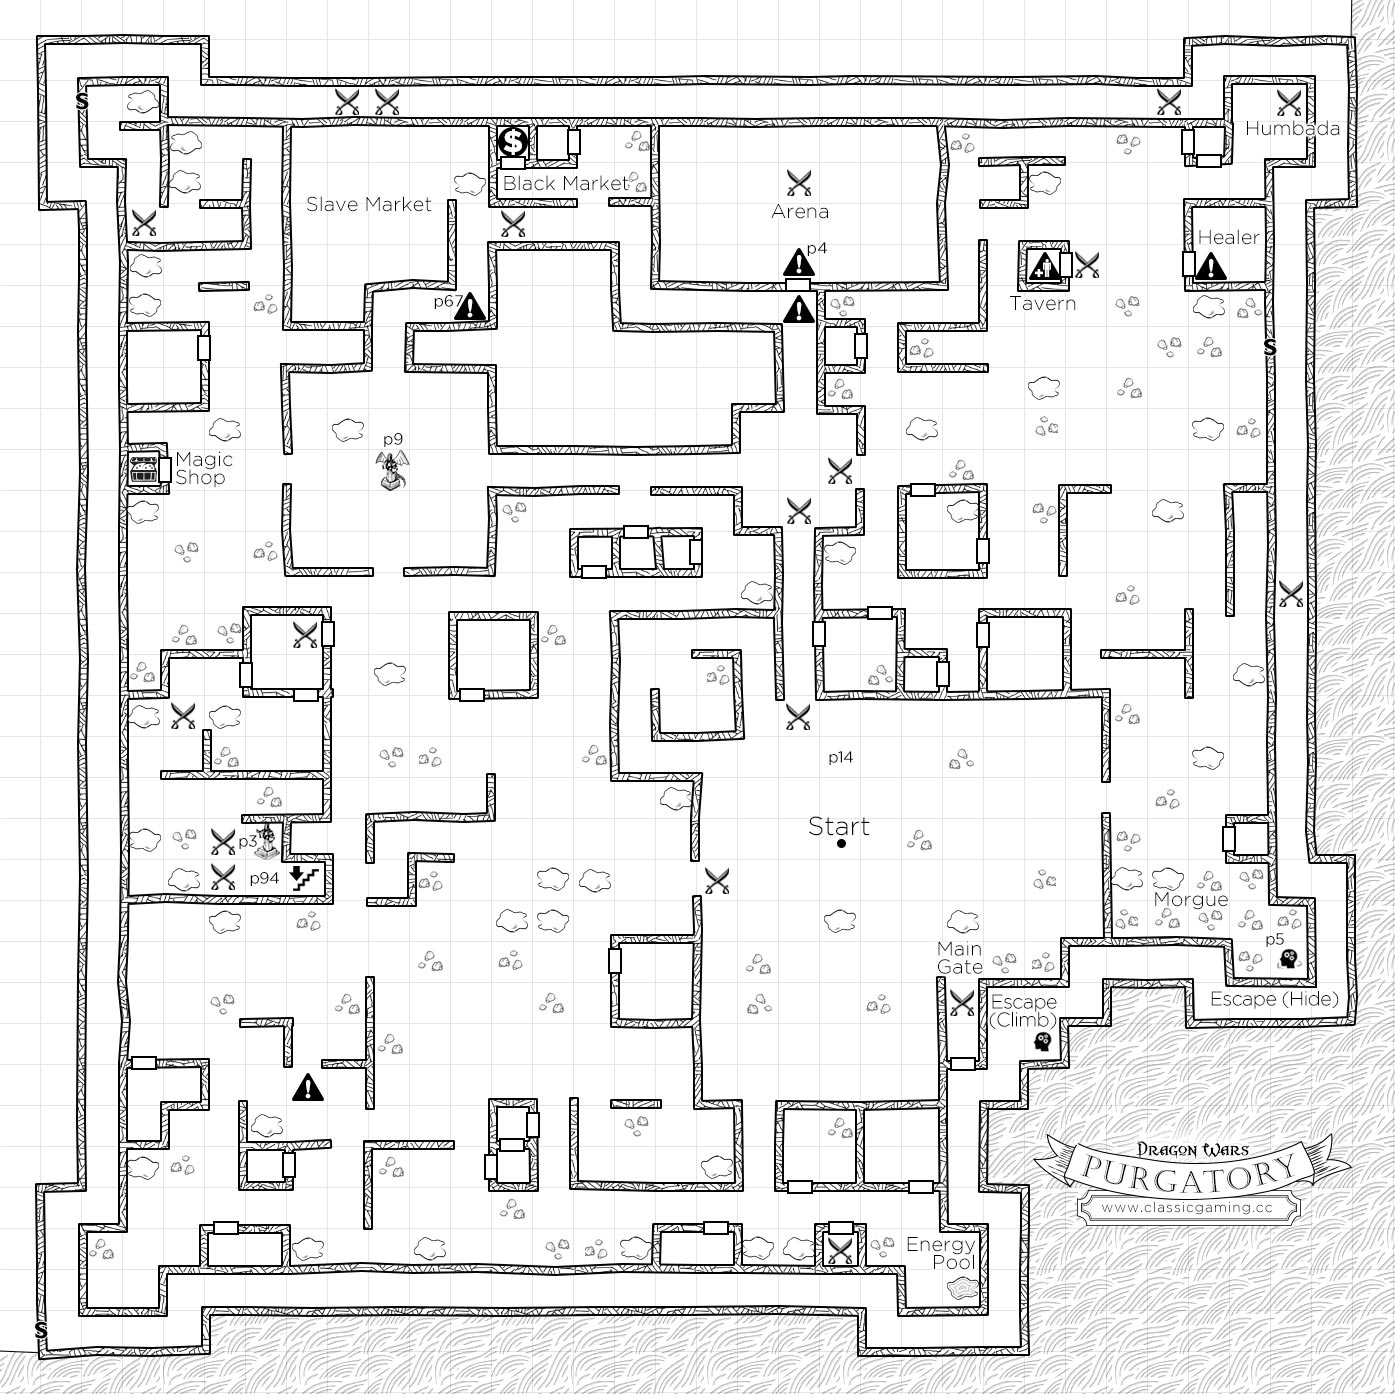
The Magan Underworld represents one of the largest single areas in the game excluding the above ground world. Its a wonderful place and accessable to many of the other locations in Dragon Wars. The Magan Underworld is a very important place within the game. There is so much to be found here. Since this area "wraps" upon itself, it is almost impossible to tell you where you will find what in this area. If we use your point of entrance from Purgatory into the Magan Underworld for reference, we can get a general sense of direction. (note: place this point in the center of your graph paper if you do decide to commit areas to hard copies)
Most encounters in the Underworld are random, so if you run into a monster you think you can't beat, run away, and then return to where the monster was before - it should be gone and you can continue on your way. If you do get caught in a nasty battle and someone dies, reload.
To the north of your point of entrance you will find two buildings. The smaller of the two contains stairs that will lead you to the Lansk Undercity (a tough place for beginning characters, but it has an armory, healer and a weapons shop not far from the stairs). The larger building of the two, while located here, is only accessable from Necropolis and contains the only means of resurrecting your characters within the game. Also to the north is a small river and lake. On the southern side of the lake there is a magic pool that restores magic power (very useful). In the center of the lake there is a small island called the ISLE OF WOE. You will not be able to reach this island until later in the game (when you have the Golden Boots), and even then you wont be able to release Irkalla until you have the Silver Key.
There is a doorway (actually, two doorways, one after the other) that goes into the larger of the two buildings, to the area where you can see the location of the ISLE OF WOE. You can only enter this area if you have provided the Purgatory statue of Irkalla with a worthy sacrifice (see above). Inside this dooway is an area bounded by water and pits. IMPORTANT: The first pit area to the west of the water in this area is safe to walk upon. Doing so will result in 5 points that can be spent upon character skill/attribute development. Don't miss this!! You cannot fall into the pits in THIS area (not true everywhere else) so check around until you locate this square. 5 points is too much to pass by.
To the west of point of entry there are stairs leading up to the Mystic Forest. To avoid any confusion, in order to return to the Magan Underworld from the Mystic Woods, a character has to use the climb ability. 3 squares south and 3 squares west of the entrance to the Mystic Woods is the first of two treasures that can be found in the Magan Underworld:
| Item | Req./Power |
| Rusty Axe | Str 18 |
| Speed Wand | Zak's Speed |
| Bomb (3) | |
| Dragon Stones (10) |
To the east of point of entry (from Purgatory) are stairs leading to Tar's Ruins Underground. This is a relatively small area map that wraps upon itself. There are secret passages that reveal treasures which I will detail later. To re-enter the Magan Underworld, you must again use the climb ability.
To the south our point of entry is an area with many fires. Each of these fires causes damage to your characters (but if a character is proficient with the bandage ability, you can heal characters whenever needed at this point). An entrance to the Dwarf Clan Hall can be found within the fires (you do not need access to this area early on). In the north area of the fires is another treasure:
| Item | Req. |
| Slicer Sword | Str 17 |
| Dragon Stones (10) |
To the east of the fire area is a large pit and a path leading south. This path forms a cross shaped area with an entrance to Salvation. Along the path you will encounter fairies that will ask if you are willing to sacrifice a life to continue. Replying "yes" will reduce you party to minimun life force. While there is reason to use this path near the end of the game, you need not explore it before hand.
Back to topParagraphs: 141, 142, 143, 144, 145
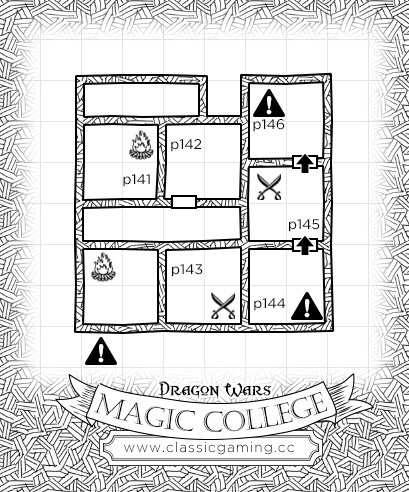
Located on the island of Rustic. You will need the Spectacles from Lanc'toor's Laboratory (located under Mud Toad) before you will be able to enter the college. The college consists of a number of tests. In the first room, use any ice spell. In the second room use Reveal Glamour and then any fire spell. In the third room use Cloak Arcane. In the fourth room use no magic, just fight it out with the philistine. In the fifth room use disarm trap. In the sixth room, walk north ignoring the comments (paragraph note 145). Utnapishtim will reward you with the choice of the Soul Bowl, the Laugh Staff or the Sing Ring, choose the soul bowl (used at Zaton's marker in the Mystic Forest).
| Spell | School |
| Soul Bowl | High Magic |
| Poog's Vortex | High Magic |
| Fire Summon | High Magic |
| Fire Light | High Magic |
| Elvar's Fire | High Magic |
| Ice Chill | High Magic |
| Big Chill | High Magic |
| Dazzle | High Magic |
| Group Heal | High Magic |
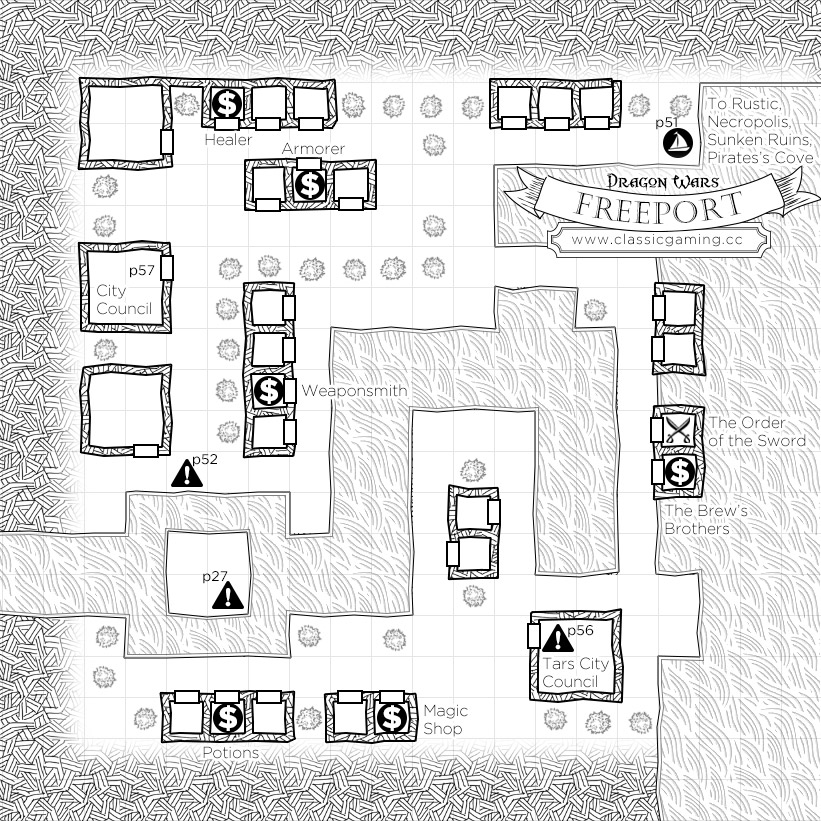
Paragraphs: 17, 20, 29, 30, 32, 113
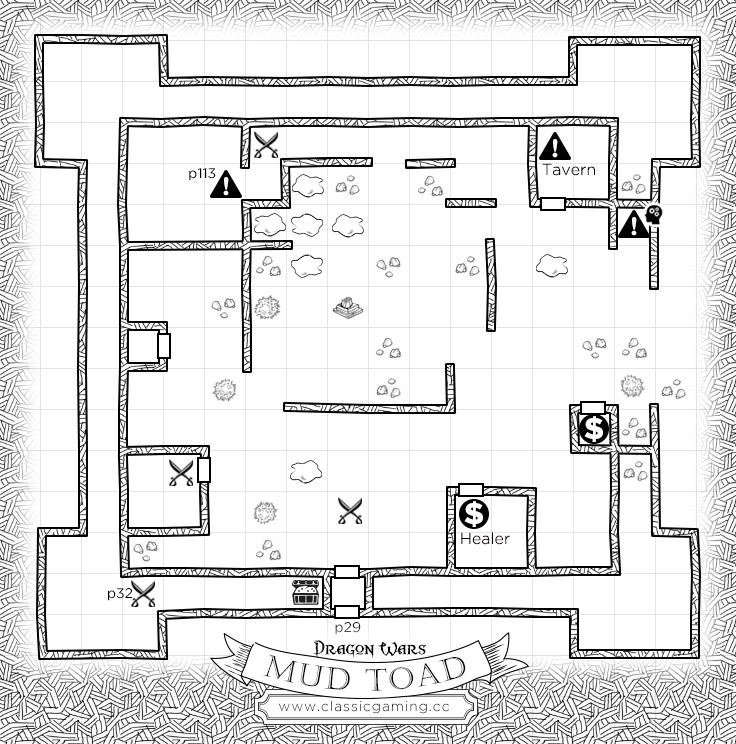
Located on Quag, this city is sinking into the swampy lands upon which it was built. You will probably be making many visits to this city during the course of your game. Almost in the center of the city is a broken statue the parts of which you will find scattered through out other areas in the game. You will need to bring each part back to this location and "use item" to restore the statue. Doing so will reveal a latch that will allow you access to Lanac'toor's Laboratory. Of other interest in this city is the temple in the northwest corner of the city. Talking to the priests there will indicate that you need to seal up the source of the water ruining the city (cast create wall). After doing so, the priests will give you a pair of Golden Boots which will allow you to access areas that you could not previously (such as the Isle of Woe in the Magan Underworld). Also of importance here is the shop in the southeastern portion of town:
| Item | Cost |
| Lantern | 10 |
| Ankh | 50 |
| Dragon Stone | 250 |
| Short Sword | 70 |
| Broadsword | 80 |
| Greatsword | 100 |
| Bow | 60 |
| Arrow (20) | 50 |
| Bolt (20) | 60 |
There is a tavern in the northeastern corner of town. If you have had your confrontation with Mystalvision in Phoebus (and have escaped the Phoebus Dungeon), you will meet Berengaria at this tavern. Berengaria will give you the following spells:
| Spell | School |
| Rage of Mithras | Sun Magic |
| Holy Aim | Sun Magic |
| Armor of Light | Sun Magic |
| Major Heal | Sun Magic |
| Summon Salamander | Sun Magic |
Within the city walls, which you can access by using climb, you will find a treasure beyond an encounter with the city militia:
| Item/Spell | School/Req. |
| Water Summon | High Magic |
| Reveal Glamour | High Magic |
| Barbed Flail | Str 16 |
| Lucky Boots | |
| Mountain Sword | 2-Handed, Mountain Lore 1 |
Paragraphs: 6, 70, 72, 79
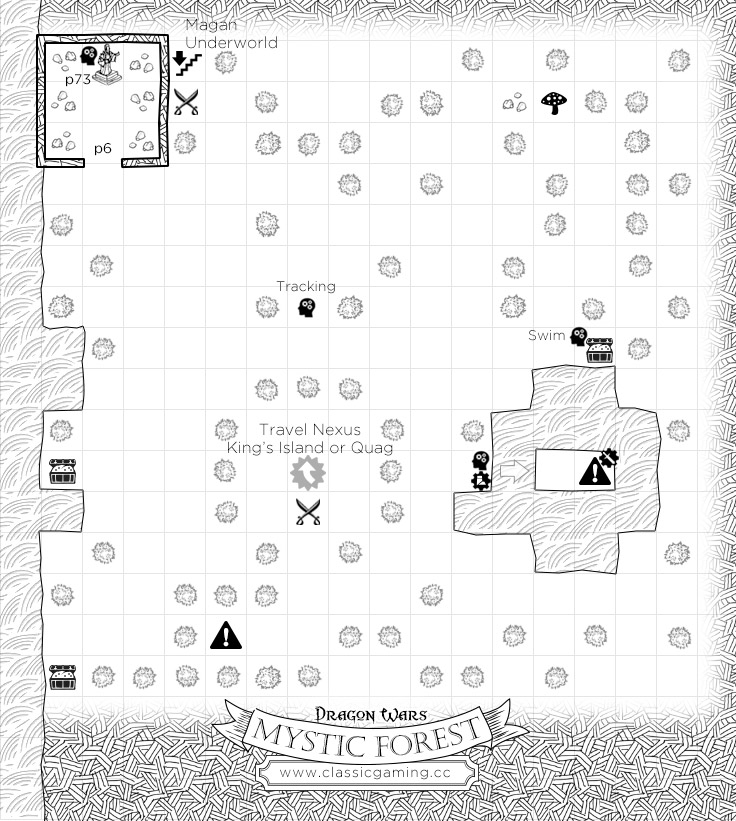
Located on the west side of the Isle of the Sun near Phoebus. From the Mystic Forest you can gain entry to the Magan Underworld, Kings Island, Quag, as well as the Isle of the Sun.
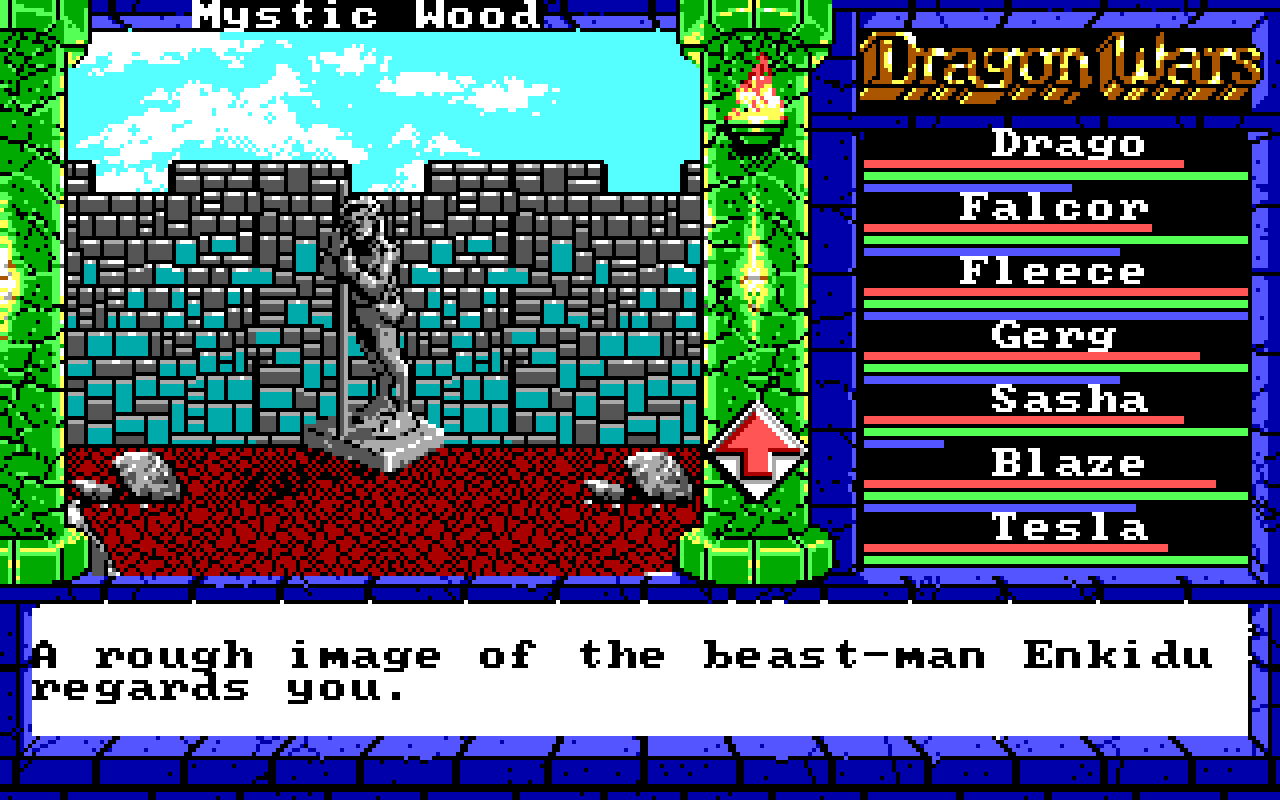
In the northwest corner there is a statue of Enkidu at the foot of which you will find a Beast Horn (summoning spell). If you use attribute "spirit" on the enkidu statue, he will come to life and challenge you to a wrestling match. If any of your characters possess a high enough strength to beat him (at least 21 on the PC, at least 22 on the Amiga), he will declare your character champion and give them druid magic as well as a nice collection of druid spells.
In the northeast side you will locate Mushrooms that will be needed in the Necropolis (only 1 is needed, though you can get as many as you like).
On the east side is an island containing a shrine. Swimming to the island results in an encounter with some nasty sea creatures. Alternatively, if you have the Golden Boots (obtained in Mud Toad), you can jump over the island without any encounter. Upon reaching the island, you will see a shrine. Use one of your weapons and you will be presented with the Totem of Enkidu (which allows you to cross the Scorpion Bridge). In the south-west corner there is a treasure:
| Spell | School |
| Death Curse | Druid Magic |
| Fire Blast | Druid Magic |
| Insect Plague | Druid Magic |
| Scare | Druid Magic |
In the south area of Mystic Forest there is a marker for Master Zaton. If you have the Soul Bowl (obtained from the the Magic College), use the bowl at this location and you will be given the following:
| Spell | School |
| Greater Heal | Druid Magic |
| Cure All | Druid Magic |
| Invoke Spirit | Druid Magic |
| Beast Call | Druid Magic |
| Wood Spirit | Druid Magic |
On the north shore of the lake, using "swim" at the right spot will result in finding a ring called "The Ring". "The Ring" casts cloak arcane.
Back to topParagraphs: 12, 93, 114, 115
This island (northeast of Quag) is accessable from Smuggler's Cove. You will experience many encounters with undead in the city of the dead, so come prepared. In the middle of the first room you will find a treasure:
| Item | Power |
| Stone Trunk | |
| Black Helm | Zak's Speed |
| Magic Chain | |
| Dead Bolt (20) |
On the west side of the city are stairs the lead down to the large building in the Magan Underworld (NOTE: you can not reach this area in the Magan Underworld from anywhere else). In this building is a well that will allow you to resurrect dead characters (the only place in the game where you can do this). On the east side of the city you will find a door leading to an area described as being covered with webs. If you cast any fire spell (i.e. Mage Fire), you can destroy all of the spider webs to avoid the encounters in this room. If you do not cast any fire spell, your party will encounter a giant spider in every square of this room. The reward at the end is a teleporter that will get you off of the island. In the center of the city is a large building - on the south side of the city is a secret passage leading inside. Following this passage will lead you to an encounter with the god Nergal. Defeat his undead minions and use the mushrooms (obtained from the Mystic Forest) to get the following items:
| Item/Spell | School/Power |
| Silver Key | Frees Irkalla |
| Holy Spear | |
| Fire Lite | High Magic |
| Insect Plague | Druid Magic |
| Scare | Druid Magic |
| Inferno | Sun Magic |
| Big Chill | High Magic |
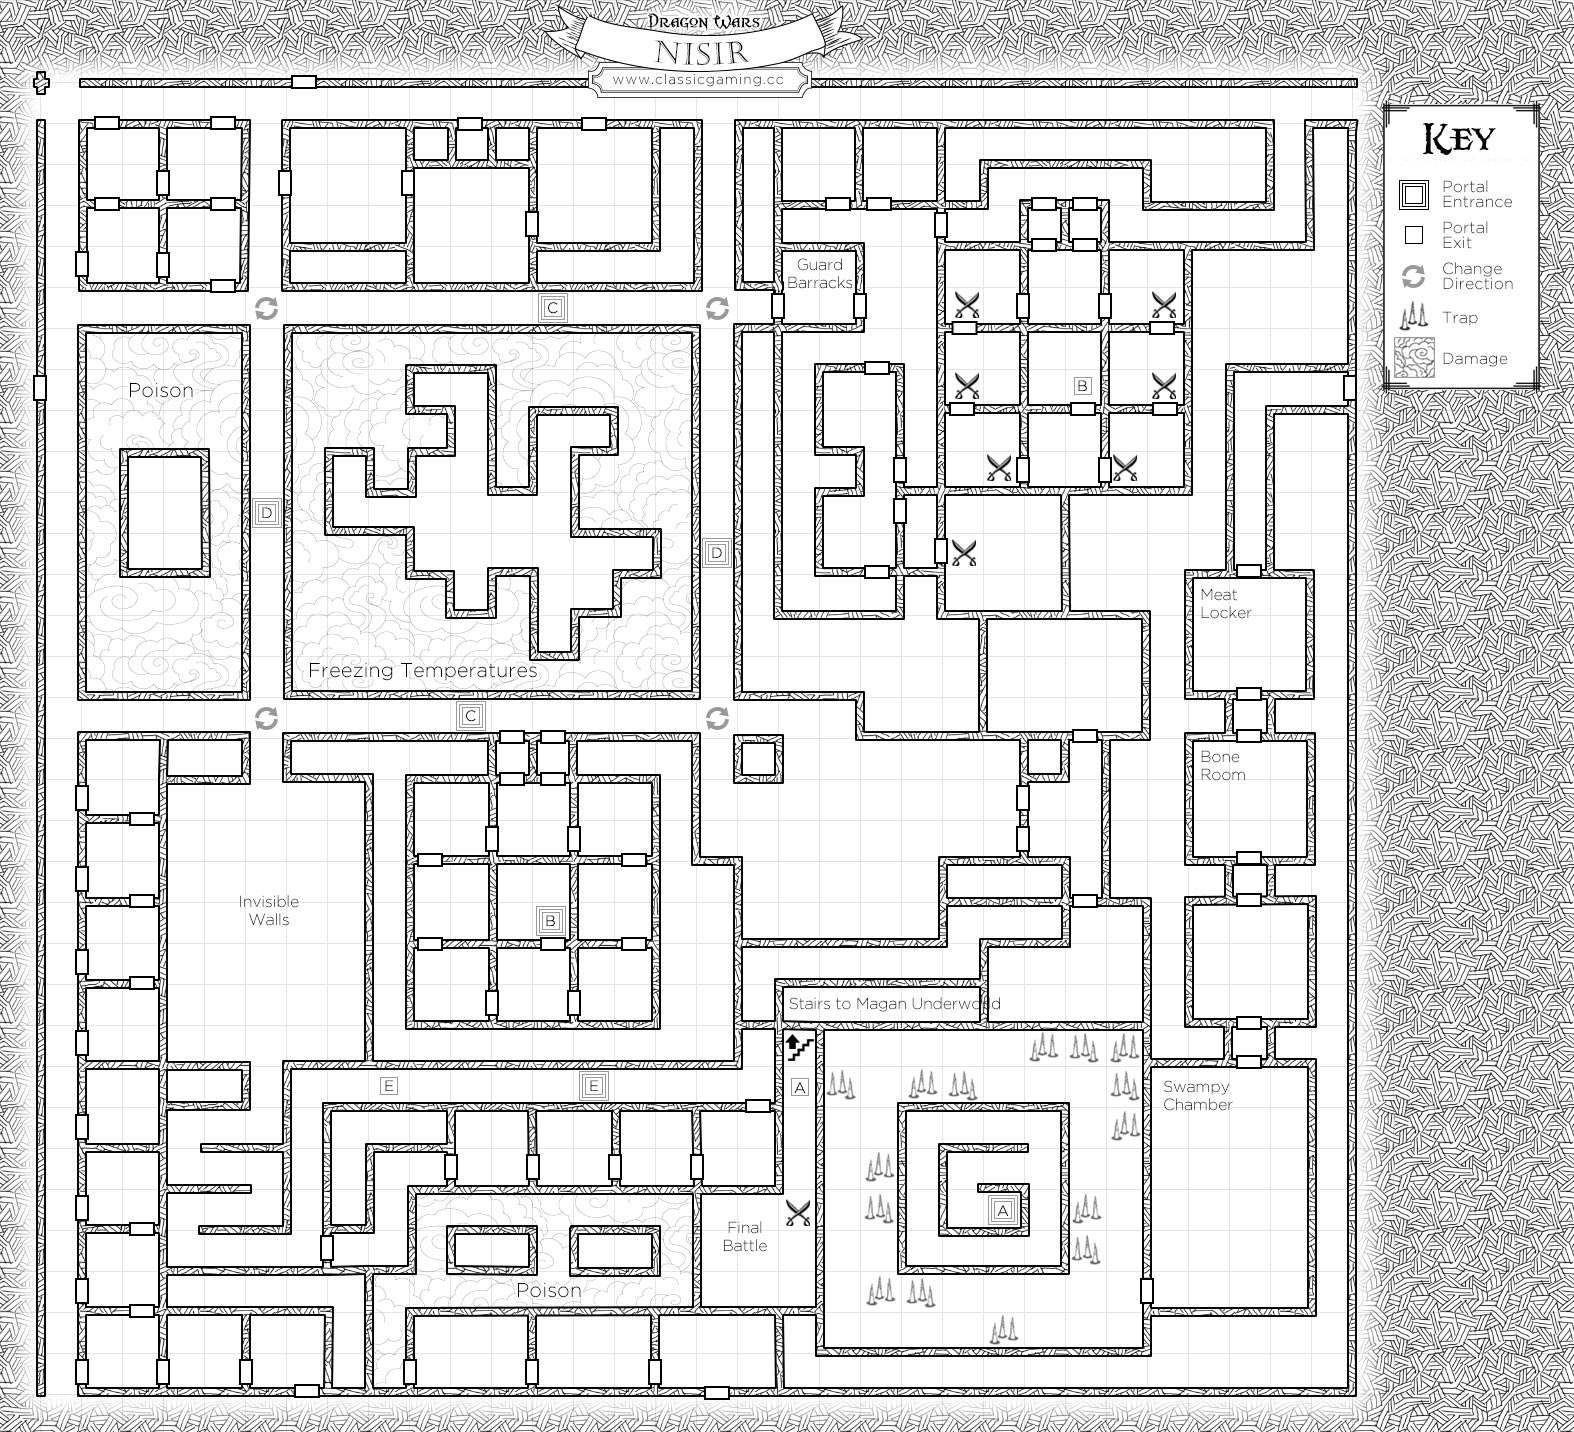
Accessable only from Salvation, this area represents the most complex area to map. The map wraps around itself and includes teleportors and spinning floors (changing your direction). Use Guidance (spell that shows your compass) to maintain your sense of direction and look at the automap often. Be prepared to use Soften Stone to destroy walls, as many areas are hard to get to (the teleporter that give you access to Namtar is a closed area). It is difficult to give precise directions on where you need to go (since the map wraps, floors spin, and teleporters jump you around) - From your start location, go 17 squares north and about 13 squares east to reach an area that will teleport you to an otherwise unaccessable area where Namtar is hiding with his army (In the bottom right of the map of Nisir is teleporter A, which send you to Namtar). Exploration of the entire area results in lots of encounters which can rapidly drain your supply of Dragon Eyes and Dragon Stones. Use cloak arcane for added protection against those encounters you cannot avoid.

Once you have reached the teleporter that will take you to Namtar, walk south. Before you enter the larger area, use the DRAGON GEM to call the Dragon Queen (if you had her enchant it in Dragon Valley). The Dragon Queen will answer and destroy Namtar and his army. If you do not have the Dragon Gem, you will need to fight the entire army (a VERY tough battle). After the army is defeated, Namtar will spring back to life. Upon falling a second time, his body will rise again - defeat him a third time and pick up his ashes. With possession of the ashes (his corpse), your party will be teleported to the Magan Underworld (near the energy restoration pool). You will have time to restore your energy before Namtar springs to life again. Kill him and head as fast as you can to the cross shaped area surrounded by deep pits (see the map of the Magan Underworld). Namtar will spring to life once again. Defeat him and use his ashes (corpse) - resulting in Namtar being thrown into the chasm that spawned him and his destruction! That completes the game.
Back to topParagraphs: 50
Located on King's Island this bridge is a one way route to the Decaying City, also known as the Snake Pit. There is nothing of importance on the bridge itself, only the note that the gate, once you pass through, disappears forever. Don't worry about that, there is another exit within the city.
Back to topAccessable from the King's Island and from the ferry in Lansk Undercity (with a King's Ticket). Passage to Lansk Undercity costs 500g. Wearing Pilgrim's garb (obtainable in Kingshome Castle) will allow you passage to Nisir. In the southwest corner is a statue that can be moved if you have a character strong enough:
| Item/Spell | School |
| Earth Summon | High Magic |
| Ice Wand | |
| IBM PS/2 | |
| Dragon Stone (7) |
This treasure will disappear after you leave the dock.
Back to topParagraphs: 25, 26, 28, 66
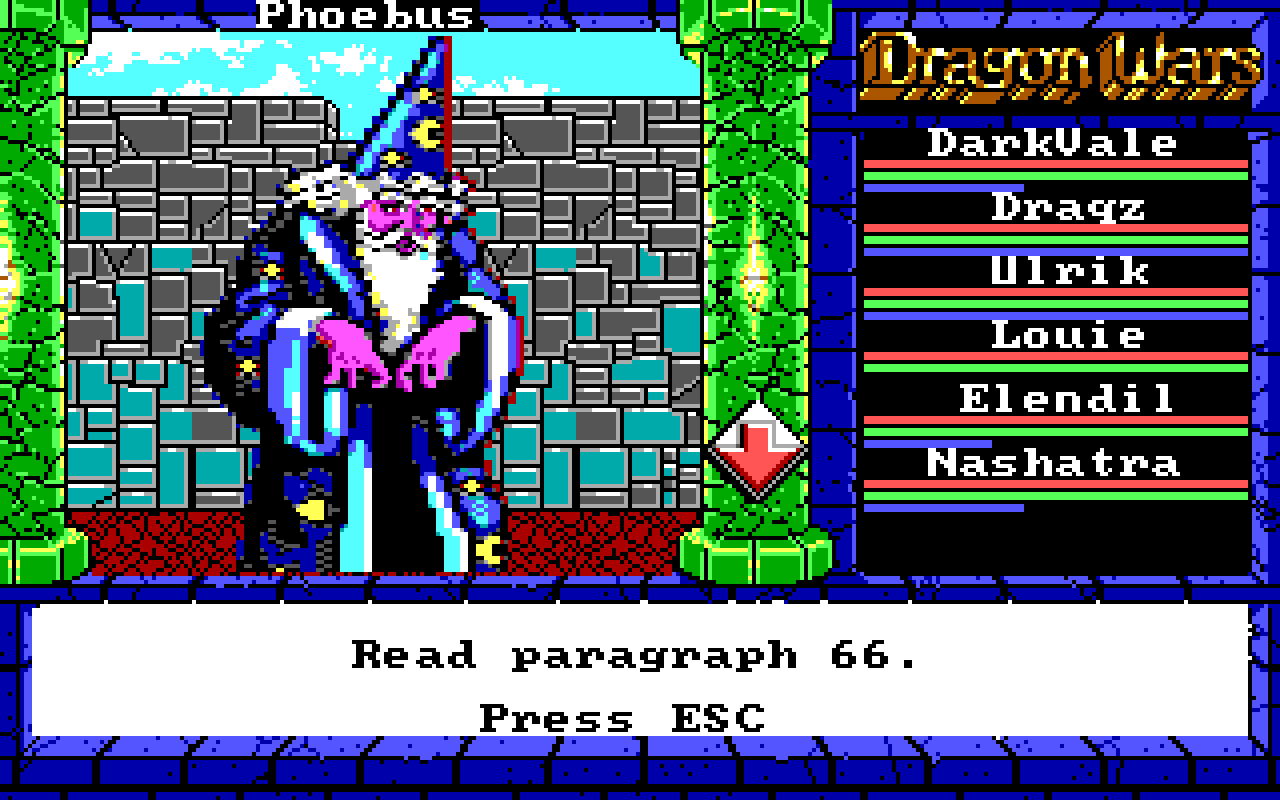
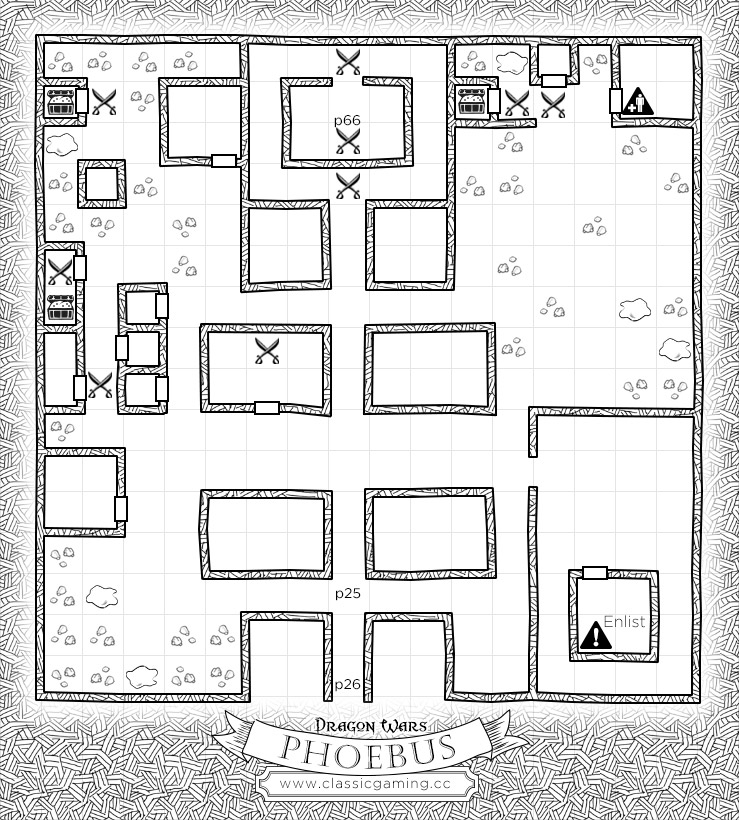
This city (on the west side of the Isle of the Sun) is not easy for beginning characters. You may be able to get through some of the encounters to access treasure but there is a big encounter with Mystalvision located in the north end of town. This battle that should not be attempted until later in the game.
There is a tavern in the northeast portion of the city where you can find the volunteer Valar. Valar has knowledge of both Low and Sun magic. He's a good addition to your party, but keep him at the back as he is rather weak and vulnerable to attack.
On the southeast side of town there are army parade grounds. Within the parade grounds is a building. Entering here will force you to make a decision ... enlist, or pay a fee of 350 gold. If you do not pay, you get drafted into the army and moved to the Siege Camp (south of the city of Byzanople). I recommend avoiding this automatic draft until later in the game.
There are 3 treasures to be found in Phoebus, two on the west side and one on the north:
| Spell | School |
| Poog's Vortex | Sun Magic |
| Sun Stroke | Sun Magic |
| Death Curse | Druid Magic |
| Create Wall | Druid Magic |
| Mithras' Bless | Sun Magic |
| Item | Type |
| Plate Mail | |
| Tri-cross | Crossbow |
| Bolt (30) | |
| Magic Shield | |
| Dragon Stones (7) |
| Item | Req. |
| Mage Cloth | Need Low magic 1 to use, and Mage Light |
| Fire Spear | Dex 14 |
| Magic Plate |
Paragraphs: 101, 102, 104, 106
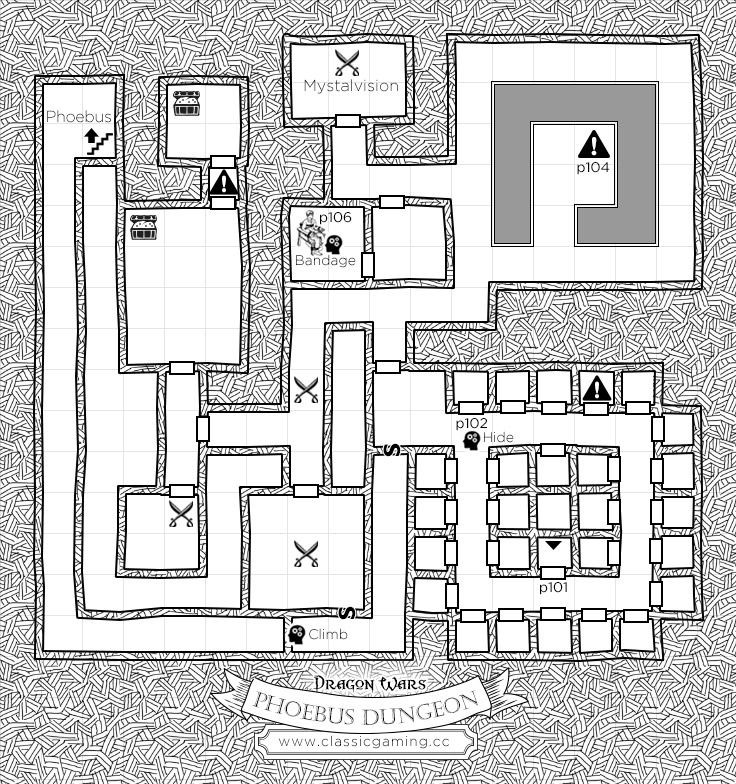
Accessable only by confronting and losing to Mystalvision in the north section of Phoebus. This is one of those areas where you need to be prepared to do everything at one time or not at all. There is no way back here once you exit. You will find yourself in a locked cell that your thief character will not be able to unlock. Patience (10 days worth) will result in Berengaria leaving the door unlocked so that you can begin your escape. Exploration of the other prison cells will reveal that the "druid is being tortured". At the location where you see message 102, use the abilility hiding to sneak past the guard. You may go either north or south once past the guard. The southern route is through a secret door. Follow the passage until you see the message that you hear voices to the north. Go north through another secret passage. One square further to the west of where you hear the voices is a cave in that you can pass with the climb ability and will lead you to stairs back to Phoebus. Save these for last. Go north and explore the rest of the Phoeban Dungeon.
In the northeast section you will find a hunchback trying to feed a prisoner to a dragon (let him feed the dragon, otherwise the entire city of Phoebus will be destroyed). West of that you will find the torture chambers and the druid mentioned earlier. Use bandage on the druid (or cast a heal spell) and he will tell you that the password is "HALIFAX". To the north of the druid is another encounter with Mystalvision - avoid this area for now and return to where you heard the voices. Northwest of this area are two treasures, one of which requires knowing the password to reach:
| Item |
| Shovel |
| Mace |
| Dagger (3) |
| Battle Axe |
| Leather Armor |
| Scale Armor |
| Chain Armor |
| Item | Power |
| Blow Horn | Whirl Wind |
| Magic Ring | Whirl Wind |
| Magic Quiver | Endless supply of arrows and Mage Fire |
| Dragon Stones (5) |
Now, return to the spot where you can find Mystalvision. This is a tough battle - upon victory Mystalvision will slip through your fingers. However, he will leave behind the following treasure:
| Spell | School |
| Armor of Lite | Sun Magic |
| Major Heal | Sun Magic |
| Disarm Trap | Sun Magic |
| Wood Spirit | Druid Magic |
| Holy Aim | Sun Magic |
Having searched the rest of this level, it is time to exit back to Phoebus.
Back to topParagraphs: 82, 83, 84, 98
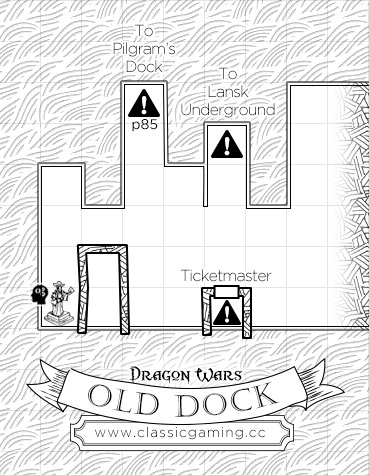
Located on the island where Salvation and Nisir are located. This dock is accessable from the Old Dock on King's Island - providing you are wearing Pilgrim's Garb (available in Kingshome). Passing through the door in the south of this small area results in a nasty encounter which should be beyond the ability of beginning characters. Once successfully defeating these monsters, you will find a prisoner and a secret passage that leads you to the mountain Salvation.
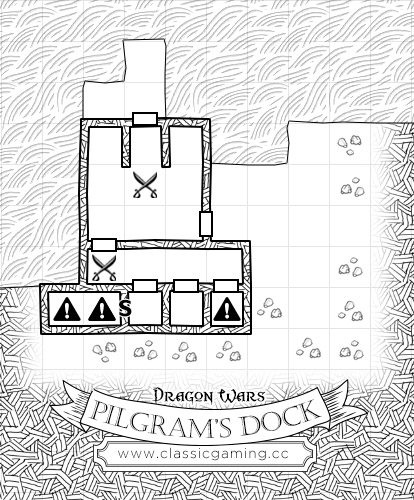
Back to topParagraphs: 3, 5, 9 10, 14, 67, 77, 94
Upon starting the game, you find your characters in the city of Purgatory with absolutely no equipment, money or clothes. Purgatory is a prison where the unwanted are thrown, and you are their newest inhabitant. If you want to stop Namtar, you need to find a way out.

First, lets get some equipment. In the middle of the north end of Purgatory there is an arena where people can enter and fight - and if you don't have any equipment, the arena will give your characters some standard equipment (be sure to equip the equipment before actually fighting). Unless you are using an imported character, you will most likely lose this fight. Losing a fight is not always terrible (unless you have a character die). In this case, you may lose the battle, but you leave the battle with your new weapons and armor. You may want to save the game before entering the battle though (just in case a character does die). Always restore when someone dies. The game is alot easier with a full party.
Now that your character's have some basic equipment, go to the tavern in the north-east and ask for Volunteers. You'll pick up a volunteer named Ulrik who has skills in Cave Lore and Axes. He's not a great character, but he adds another member to your party (which gives you another weapon attack, and one extra target for enemies).
Now, let's get your characters some spells. For any character who have the Low Magic ability, there is a magic shop in the west of Purgatory. Fortunately, these spells are FREE.
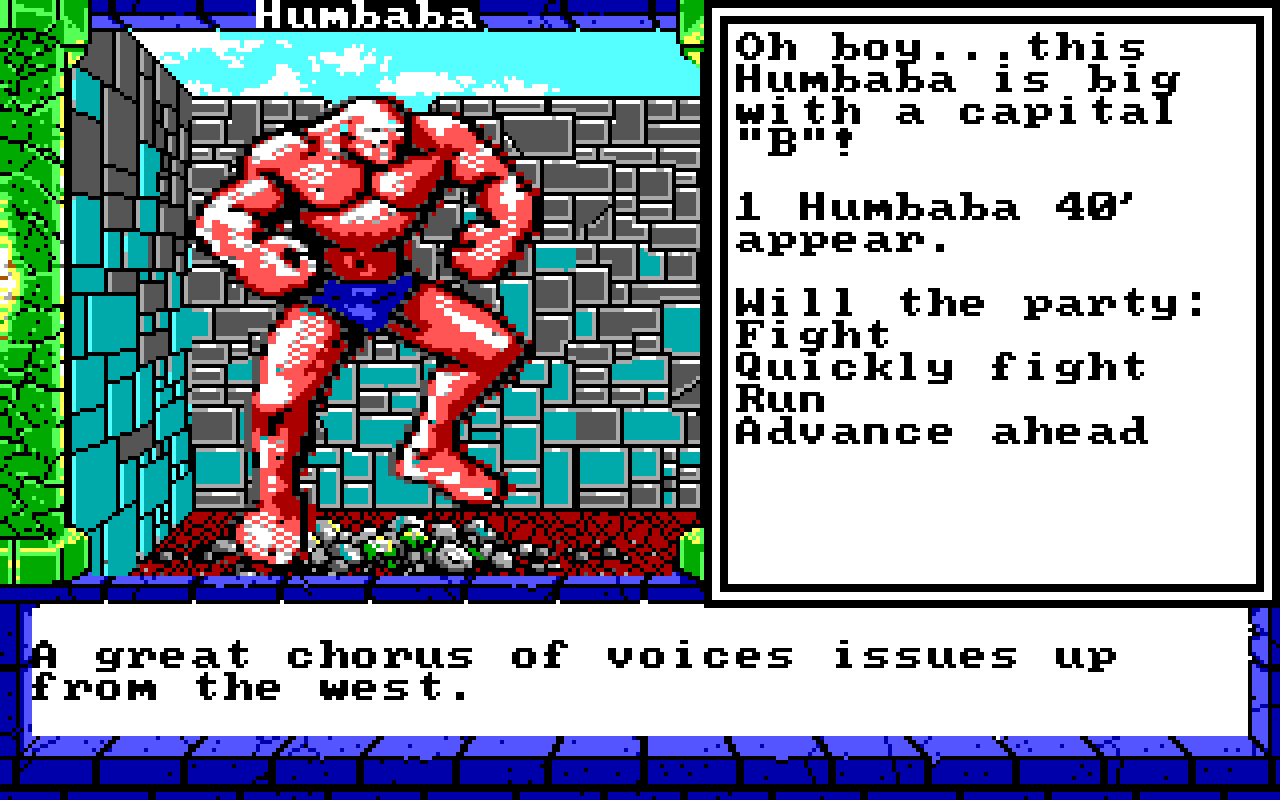
Before trying to find an exit, it's best to get some gold (and experience) first. Go to the south-west portion of the city. Here you will find a thief who asks if you are one of them - a no-good thief and criminal. Stoutly say "no," as you don't want to be associated with the rabble of Purgatory. They will give you a small quest to prove your worth - defeat the Humbaba monster in the north-east corner of the city. (If you are using a new party, you may want to strengthen them up a little first - go around purgatory and fight a little). When you are ready, go defeat the Humbaba and return to the challengers. You will recieve 1000 gold pieces for your efforts!
With some gold, you can now visit the Purgatory Black Market. Along the north wall (west of the arena) is the Black Market, a good place to buy some better equipment with the 1000 gold you obtained from the thieves. The best use of your money at this stage is in better armor (do not buy dragon stones at this point. They are expensive and within unnecessary within Purgatory - on the south side of the city there is a magic pool which will restore magic energy).
| Item | Cost |
| Hand Axe | 60 |
| Small Pick | 50 |
| Pick | 60 |
| Battle Axe | 70 |
| Flail | 40 |
| Mace | 40 |
| Dagger | 30 |
| Short Sword | 50 |
| Broadsword | 60 |
| Greatsword | 80 |
| Bow | 60 |
| longbow | 90 |
| Crossbow | 60 |
| Arrow (20) | 50 |
| Bolt (20) | 60 |
| Javelin | 40 |
| Cloth | 25 |
| Leather | 50 |
| Brigadine | 80 |
| Scale | 250 |
| Dragon Stone | 250 |
There are several ways to escape Purgatory:
The Magan Underworld is not the safest place, but it is a good option for escape. The entrance to the Magan Underworld is on the west side of Purgatory, near the statue to Irkalla. Before stepping into the Magan Underworld it would be wise to recieve Irkalla's blessing. Offer the statue of Irkalla a worthy sacrafice - a weapon should do nicely. If you recieve a response like "Irkalla is pleased", then you should enter the Magan Underworld (however, you may want to save first, as the Magan Underworld is a dangerous place)
Back to topThis area of Dilmun includes a Nexus in the north to Mystic Forest, the city of Yellow Mud Toad and Smuggler's Cove. Murk trees live on this area and are dangerous monsters - capable of killing party members without much difficulty. Proceed with caution. Northest, but not connected to Quag is Necropolis. A bridge also leads to the area of Dilmun that includes Lansk.
Back to topParagraphs: 47
You need the Governor's Pass to cross this bridge. The pass is obtainable in either Lansk or Lansk Undercity (easier).
Back to topOne of the islands of Dilmun. Accessable with the ship from Smuggler's Cove, this island contains the Game Preserve, Scorpion Bridge and a Strange Building (the Magic College).
Back to topParagraphs: 49, 60, 61
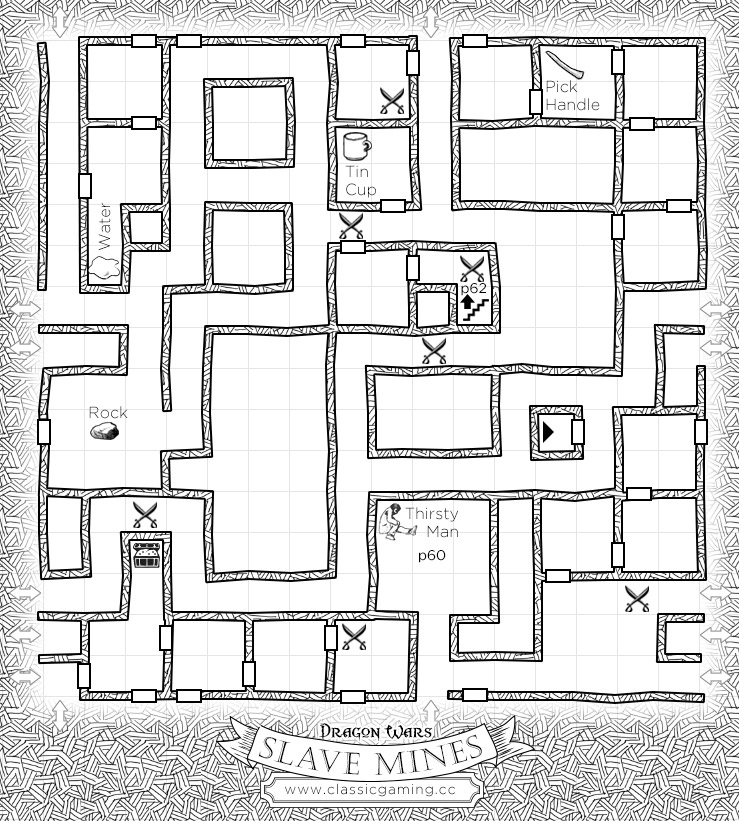
If you sell yourself into slavery in Purgatory, you are sent to the Salt Mines. Note: You can only access this location by being sold into slavery. When you are brought here all your equipment is removed and you are in chains. Wandering around this area you will find a cup, a pool (fill the cup with water), a handle, a treasure of rocks and Dragon Stones (9 quantity). When you find the thirsty man, use the filled cup and he will give you his shoe strings. Using the laces (use item) you and you will be able to make a crude hammer out of the handle, string and rocks. You can now break the chains, allowing you characters to be able to reach your equipment (located in the pile of trash). Thus re-equipped, you can challenge the guards and escape to the surface.
Back to topParagraphs: 55, 97, 100
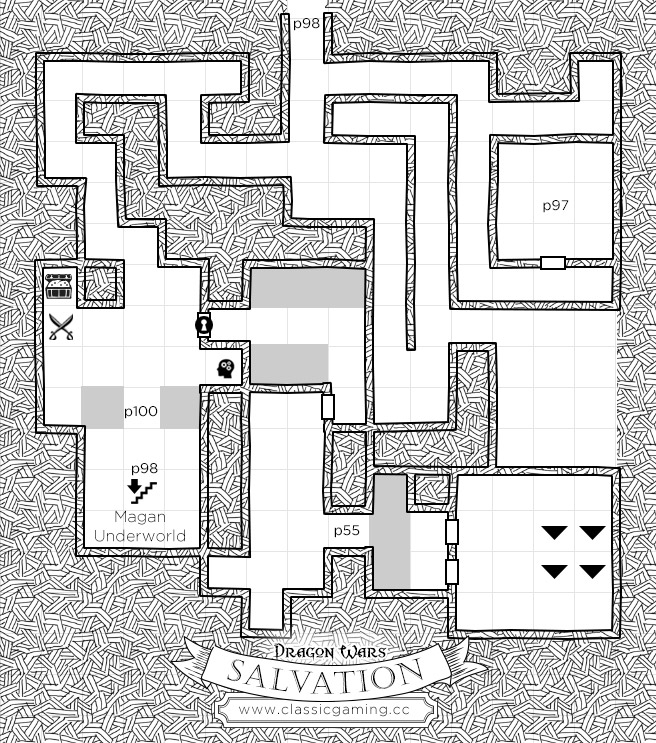
Accessable from Nisir or Magan Underworld. The exit to Nisir is in the north and the stairs to the Magan Underworld are in the southwestern area. On the west side there is a treasure guarded by a rather nasty group of monsters:
| Item | Notes |
| Mage Staff | Worth 10,000 |
| Dragon Helm | |
| Dragon Plate | |
| Spiked Mace | |
| Heavy Sword | |
| Dragon Stones (28) |
On the east side of Salvation is a shrine to the universal god. Use the Freedom Sword at the shrine and you will be able to cast inferno using the Freedom Sword. Not far from the stairs to Magan Underworld and the treasure is a door. Avoid it (inside are a group of creatures ready to attack - there is a way around them). Near this door is an area where you will get a message about an intelligent man could figure out a way through this wall. Use intelligence (choose a character with a high intelligence) and then use the climb ability. You will now be in an area where (3 squares south and 2 squares east) you overlook a chasm. Use the Golden Boots to jump the chasm and enter the door. You will find yourself in a large room, and upon exploring, you will suddenly find yourself falling into the depths of Nisir.
Back to topParagraphs: 48
Located on the island of Rustic. Scorpion men will bar your way until you use the Enkidu Totem (obtained in the Mystic Forest). Within the bridge building there are several nasty encounters. In the north of this building is a treasure:
| Item |
| Bones |
| Barbed Flail |
| Magic Shield |
| Gold (1500) |
Paragraphs: 59, 87, 90
Accessable from King's Island or by being drafted into the army in Phoebus. Don't worry about joining the wrong side, your stay in the Seige camp is temporary. Near the southern entrance to the Siege Camp is a healer. In the north of this area is a Black Market:
| Item | Req. |
| Bladed Flail | 1000 |
| Mace | 70 |
| Dagger | 30 |
| Short Sword | 50 |
| Broadsword | 60 |
| Polearm | 90 |
| Bow | 60 |
| Long Bow | 90 |
| Crossbow | 60 |
| Arrow (20) | 50 |
| Bolt (20) | 60 |
| Chain | 310 |
| Shield | 1000 |
| Large Shield | 1000 |
There are two treasures to be found in the siege camp, one in the northern section of this area and one in the south:
| Item | Req. |
| Lance Sword | Str 12 |
| Silver Gloves |
| Item |
| Silver Arrows |
Exiting the Siege Camp to the north will allow you to enter Byzanople. After some encounters in Byzanople, you will return to the Siege Camp through a secret underground passage. There will be a sizable battle which is definitely too difficult for beginning characters.
Back to topParagraphs: 19, 63, 68, 88
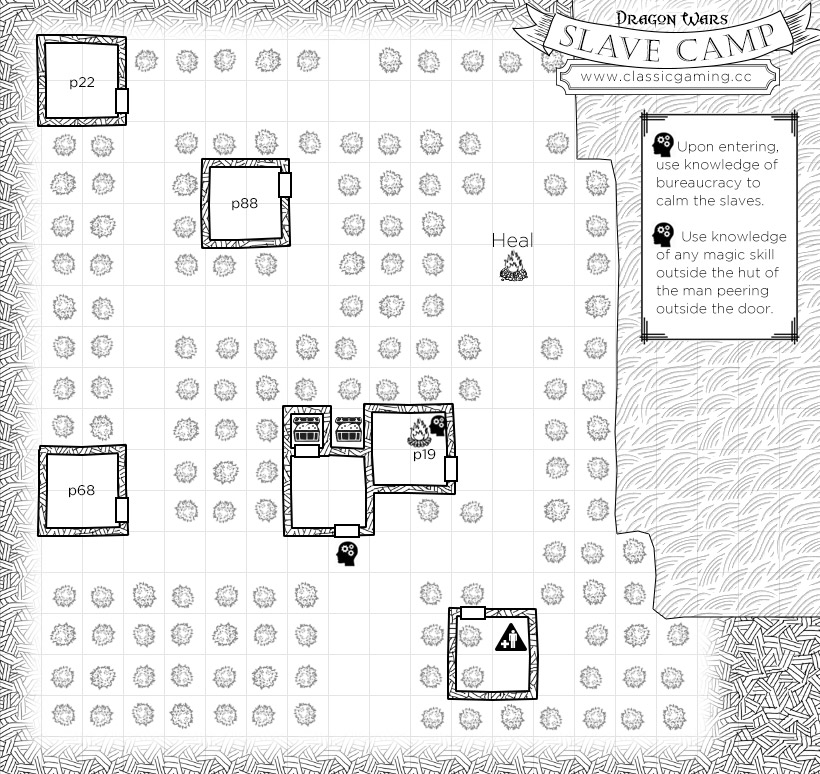
Located southwest of Purgatory, use Bureaucracy to gain the escaped slaves trust. There are six small buildings located in the Slave Camp and three treasures, a campfire that will heal all wounds and the volunteer Louie can be found here. Use one of your magic skills when you locate the wizard watching you from his doorway - otherwise he will not allow you into his hut to gather one of the treasures:
| Spell | School |
| Greater Heal | Druid Magic |
| Sun Stroke | Sun Magic |
| Spell | School |
| Healing | High Magic |
| Cloak Arcane | High Magic |
| Sense Traps | High Magic |
| Scare | Druid Magic |
| Leather Armor | |
| Brigadine (2) | |
| Chain |
| Item | Req. |
| Citizen Papers | |
| Ruby Dagger | Str 3 |
| War Axe | |
| War Flail | |
| Hammer | |
| Polearm | |
| White Arrow | |
| Spear | |
| Chain | |
| Fire Light | High Magic |
| Dragon Stone (5) |
Paragraphs: 1, 99, 103, 105, 117
Located on Forlorn. You can learn in Lansk that Mog left this estate to you. There are two buildings on the estate, one large and one small. Surrounding the estate are gardens with numerous statues. Enter the large building through either of the entrances on the EAST side (there is an entrance on the west side, but avoid this entrance initially). There are four treasures to be found in the large building:
| Item | Req. | Hammer |
| Ruby Dagger | Str 3 |
| Short Sword | |
| Dragon Stones (6) |
| Spell | School |
| Mirror (infinate #) |
| Item | Req./Power | Gauntlets |
| Helm | Str 3 |
| Arrow | |
| Magic Lamp | 20 charges of light spell |
| Shield | |
| Gold (1500) |
| Item |
| Hand Axe |
| Gold (100) |
In the southwest corner of the large building you will find the artisan of the statues you have seen in the gardens. He is actually a Gaze Monster. Equip the mirror to avoid being turned to stone.
Back to topParagraphs: 3, 24, 39, 41, 43
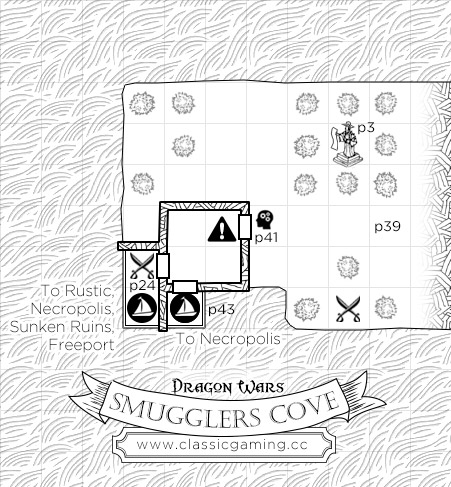
Located north of Mud Toad on Quag, this is the pirate hangout of Long John Ugly. On the northeast you wlil find a statue to Irkalla at which you can pray. On the west you will find Long John's hang out. There are two ways to gain entrance, either use any thief skill (hide, etc.) or use Bureaucracy and pay at least 50g to enter. Inside you will find two doors, one to the west and the other to the south. Upon gaining admittance, the pirates will warn you not to enter the door to the west, but you are free to go through the southern door. The southern door leads to a dock, where Long John Ugly will offer to ferry you to Necropolis ... but he will just drop you off, and not bring you back (Necropolis is not easy for beginning character, so you may want to avoid this trip early on). The west door reveals the pirates most precious possession, an infamous sailing ship. The pirates will fight you to the death for this ship and they are a nasty bunch! They can be defeated, but it is not easy. Defeating them allows you unlimited use of the ship and a treasure:
| Spell | School |
| Gold (3000) | |
| Pilgram's Garb | |
| Old Peg Leg | |
| Hook | |
| Parrot | |
| Heavy Plate | |
| Jade Eyes | needed in Dwarf Ruins |
This treasure chest will disappear even if you do not remove all its contents. Take the gold and the Jade Eyes and the plate.
Back to topParagraphs: 75, 76, 80, 81
This city is located on the southwest corner of King's Island and is accessable from the Old Bridge. On the north you will find the King's boathouse. Leave the lad who is guarding this building alone until you locate the secret rooms in the center of the large cluster of buildings in the center of the city. In the wooded area in the north you will find Branches. Use the Branches at the old man in the tree on the south side of this area will get you the beast call spell. The STONE HEAD needed for the statue in Mud Toad is found on the west shore of this area. There is a large cluster of buildings in the center of the Snake Pit. A secret passage from the room with the jester leads north into the room where you will find two treasures:
| Spell | School |
| Signet Ring | |
| Jewels | worth 4000 |
| Item | Req. | Luck Wand |
| Crush Mace | |
| Mega Bolt | |
| Grand Sword | |
| Magic Bow | Dex 10 |
Use the signet ring where the boy guards the boat house and you have access through a secret door to a boat that will take you out of this area and left near Kingshome.
Back to topSee Magic College.
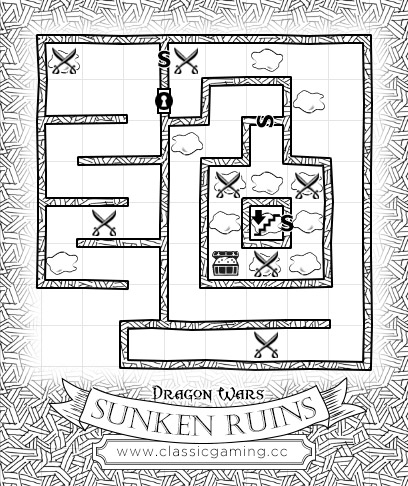
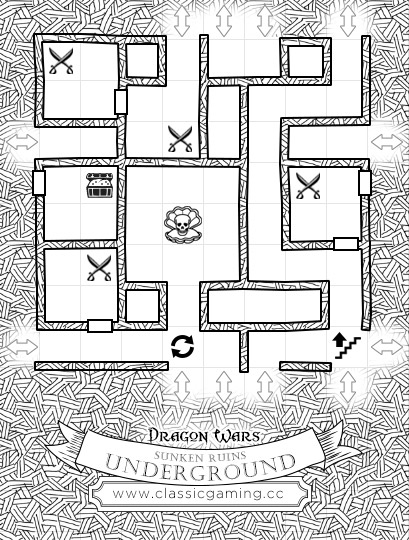
Back to topAccessable from the Eastern Isles (with the ship from Smuggler's Cove), you need to have freed Irkalla from the Isle of Woe prior to fully exploring this area. Irkalla would have given you a breath water potion that will be needed to enter the lower level of this area. The upper level features a locked door that take a skill of lockpick 4 to open and two secret passages. In the center area there is a treasure:
| Item |
| Driftwood |
| Flotsam |
| Spiked Flail |
| Driftwood |
Get rid of the driftwood and the flotsam, as they are useless.
Using the breath water potion you can enter the lower area. The map wraps upon itself here and is relatively small in size. In one large room you will find a clam containing the Skull of Roba. Do not attempt to take the skull from the clam, just take the entire clam (and everything in it). Upon resurfacing, the clam will disappear, and you will have it's contents. There is a locker to be found in this area:
| Item |
| Trident |
| Dragon Plate |
| Dragon Sword |
The locker is guarded by some pretty nasty creatures, but the treasure contains some good items.
Back to topParagraphs: 23
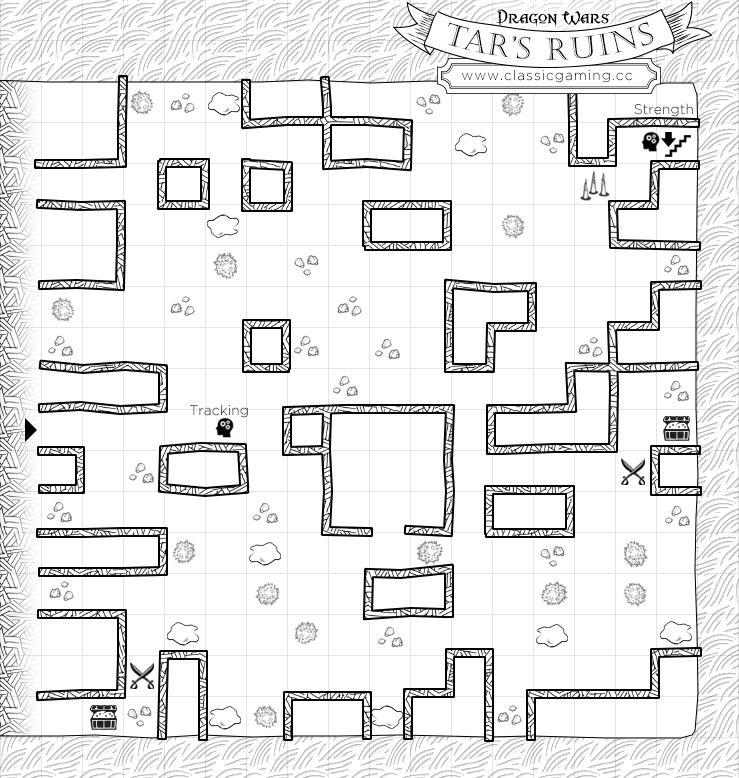
This area is accessable from Forlorn or from the Tar's Ruins Underground. To reveal the entrance to the underground use strength on a rock in the northeast side. On the west side you will find the body of a dead hero:
| Item |
| Firesword |
| Large Shield |
| Dragon Stones (6) |
On the southwest, you will find a cache of scrolls:
| Spell | School |
| Air Summon | High Magic |
| Elvar's Fire | High Magic |
| Exorcism | Sun Magic |
| Guidance | Sun Magic |
In the center of the ruins is a 3x3 square building upon whose walls you will see mural. These murals are an important hint on how to deal with the Lansk Dragon.
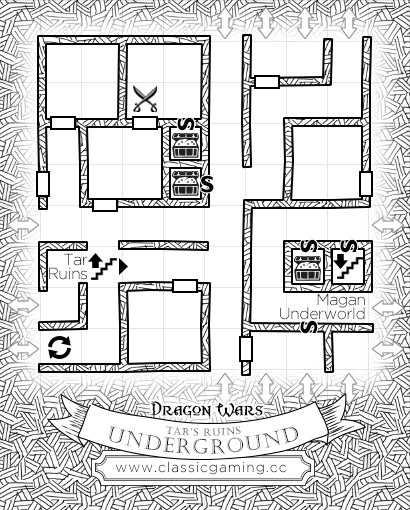
Back to topAccessable from the Magan Underworld and from the Ruins on Forlorn. The entrance from the Magan Underworld leaves you in a small enclosed room. To return to Magan Underworld, use the climb ability. To explore this area, exit through the secret passage to the north. Immediately east of the square just described is another secret room containing Stone Arms (which are needed in Mud Toad). This area wraps upon itself and it doesn't take too much exploration to locate the other two secret passages that contain treasures:
| Item |
| Healing Potion |
| Dragon Stone (5) |
| Spell | School |
| Gold (2500) | |
| Fire Light | High Magic |
| Death Curse | Druid Magic |
| Sun Stroke | Sun Magic |
| Gold (1000) | Sun Magic |
See Mud Toad.
When you save and then restart the game, you begin with the last party you had, and retain all of your spells, attributes and abilities (and any unspent skill points). Since there is a way to get 5 points, per character, very early on in the game, you can exploit this restart feature. So, go get the 5 points, restart, get 5 more points and then restart again, etc. This can help you build a very strong (god-like) party.
In order to get your free points, you need a weapon (to sacrifice to Irkalla), and it's recommended to have a light for the Magan Underworld (optional, but highly recommended).
When you start in Purgatory, head to the Arena. Before entering, SAVE (just in case). Enter the Arena and accept the free equipment. All you really need is a broadsword. If you want, feel free to equip your new weapons/armor (it's useful, but not necessary). Fight the battle - it doesn't matter if you win or lose. If any of your characters die, load your last save and try again. Now you have your weapon.
This is optional. If one of your characters has the Low Magic ability, and can't already cast Mage Light, you can get the spell for free. Along the western wall of Purgatory is a magic shop where they are giving away spells for free. Get Mage Light, and use the scroll to learn it.
Head to Irkalla's statue in the western part of Purgatory. Before you approach the statue, SAVE. Now, move onto the statue and choose to pray. When it asks for a sacrifice, use a broadsword, or use another weapon. If Irkalla is pleased, enter the Aspu waters (if she is not pleased, either try another weapon, or load your last save and try again). Now, enter the Aspu Water.
In the Magan Underworld, the first thing to do is cast Mage Light so you can see. This is not necessary, but makes it alot easier to see. Now, move northeast toward a large stone building. Fighting in the Magan Underworld is not recommended for low level characters - if you run into any nasty creatures, just run away. Enter the door on the western side of the building. If you pleased Irkalla with your sacrifice, you will be allowed to enter her realm. If she was not pleased, you will not have access to this area (head back to Purgatory and sacrifice another weapon to Irkalla). Inside her realm, move to the edge of the pit, just left of where the water starts. Now, step into the chasm. You will find yourself standing on air and will be rewarded with 5 points (per character) for your bravery. You have your reward and can restart, or read on for an extra bonus.
If you have a character with a strength of at least 21, that doesn't already have Druid Magic, leave Irkalla's realm and proceed south to the Mystic Forest stairs. Take the stairs up and you will appear against a wall. Going south will lead to an encounter that you probably can't win, so cicle around it and enter the walled area. If you run into any monsters, flee and try again. In the walled area, walk up to the statue of Enkidu. Have any character use the attribute Spirit. Enkidu will come to life and challenge a character to a wrestling match. Select a character with a strength of 21 or more. A strong character will win the fight and be given the gift of Druid Magic and a nice collection of spells.
Successfully doing all of the above will grant you 5 points per character, and give one of your characters Druid Magic along with a nice collection of spells. If you raise all of your characters strengh above 21, you can have Enkidu grant Druid Magic to all of them (each time you restart).
If you want to push things even further, there are plenty of spells on the island of Forlorn (in the Slave Camp, Tar Ruins and Tar Ruins Underground). For example, Tar Ruins has a treasure that contains the Exorcism spell, which is useful against the undead (and it's the only place in the game to get the spell). So, before restarting, you might want to head over there first. Note: It is important to SAVE before restarting (in the DOS version of the game) - otherwise, any unsaved spells or points are not transfered to the new party.