While I will, to the best of my abilities, write as detailed of a
guide as is possible, it is important to note that much of the game
is randomized. For instance, while at the Pacifica Training School,
you will periodically receive an allowance of C-Bills. If you are
in certain areas, you will continue to receive money while remaining
there, and in other areas, you will not receive anything at all. Since
these locations are randomized by the game, you will have to wander
around until you find one of these cash spots. In addition, you will
find that characteristics (and alliances) of potential party members
can also be random, in addition to the location of battles. Having
said that: on to the walkthrough!
Jason (you) are the little blue fellow right in the center of the
right window. As the game starts, you'll be just south of a large,
blue building called the Citadel. Go ahead and enter, and you'll find
yourself with several options:
- Request to see Katrina
- Visit Hall of Legends
- Enroll in Combat Class
- Talk to others
- Leave the Citadel
A word about the "talk to others" option: oftentimes, you'll find that choosing
it will simply result in the message that noone seems interested in talking to
you. Throughout your travels in the Pacifica Training School and in other
cities, you'll encounter other people walking around. Getting the message that
noone is interested in chatting simply means that noone is currently in the
building that you are in. If you are really interested in talking to someone,
you may have to wander around until you see a person walking into a building.
Then, enter right after they do, and you should be able to initiate a
conversation.
At any rate, there isn't really anyone you want/need to talk to here, other
than Katrina. Request to see her, and even though she can't chat long, she'll
tell you that you should hurry and complete a training mission. Don't worry,
though, as there isn't really a time limit here. It isn't necessary, but you
may want to visit the Hall of Legends, for a little bit of background
information on Katrina, the Locust Mech, the rare Phoenix Hawk Mech (which your
father, Jeremiah, pilots), a brilliant scientist named Edward Tellhim, who has
retired somewhere in the north, and the Kell Hounds mercenary unit. If you'd
like, check out the combat classes as well, even though you can't afford it
just yet; you'll definitely want to be coming back here later to toughen up.
A note about taking classes: immediately after taking one, you won't be able to
take another one for a short while, so you'll have to walk around or complete a
training mission to take another one.
Leave the Citadel, and start walking to the east. Just down the road is a
large red building, the appearance of which you may want to familiarize
yourself with. This is the Comstar Station, in which you can:
- Inspect your Accounts
- Change Investments
- Review Prospectus
- Leave ComStar Station
- Talk to others
- Leave
Now, you probably don't have very many C-Bills on you, so it probably isn't the
best idea in the world to invest it. Of course, it could turn out to be a
brilliant idea, making you money very quickly. Before you attempt to do this,
however, you should definitely save your game. Baker Pharmaceuticals usually
works well for me, but again, this can sometimes be random. Leave the ComStar
Station and walk around for a little while. Soon, if you haven't already, you
should see your C-Bills increase by an increment of 15. This is an allowance,
which you'll be receiving periodically. Now, I know that Katrina told you to
hurry up and get some training missions under your belt, but like I said, there
is no time limit as of now.
So, move over to an area where your C-Bills increase, then go take a nap, have
some dinner, clip your toenails, whatever. Whenever you're ready, come back,
and your wallet should be a bit fatter. Remember, however, that you only get
money in some areas (random). So, make sure you are in such a place before you
go take off, so that you don't waste your time for nothing. Now that you have
a little bit of spending money, you may want to invest it, take a combat class,
etc. I suppose it's cheating, but you can always save your game before you
invest, to make sure you don't lose your savings.
At any rate, whenever you're ready, follow the road to the northwest,
until you reach the corner of the gated compound. The large blue building
in this corner contains the Barracks, which you'll want to keep in
mind for later. Walk to the south and slightly to the east, and you'll
see a cluster of white buildings nearby. The one with a large blue
orb atop it is the Weapons Shop. If you wish, enter and browse, even
though you probably won't be able to afford any of the more powerful
types. To be perfectly honest, I wouldn't even bother wasting any
money at all on anything less than a rifle or sub-machine gun. If
armed with something like a sword or even a pistol, it's almost better
to just run away from hostilities, rather than taking a lot of damage.
Also note that the "Anti-Mech weaponry" isn't only for use against
BattleMechs, but is in fact also the best weaponry to use against
enemy ground troops as well.
Exit the Weapons shop and head to the southwest corner of the compound. The
blue building just to the north of the southwest exit is the Mechit-Lube, in
which you can:
- Ask to Apprentice
- Visit speed shop
- Have 'Mechs repaired
- Buy 'Mech ammunition
- Talk to others
- Leave the Mechit-Lube
Most of these options aren't really applicable to you just yet, since
you're not in possession of your own BattleMech. However, the apprenticeship
is certainly something you'll want to keep in mind. Even though it
costs a hefty 500 C-Bills, it will more than pay for itself later,
as you'll be able to repair and salvage in the field. You don't have
to take it right away, of course, so if you're not sure about it just
yet, go ahead and leave.
Walk to the east, and you'll come across a white building to the south, and a
large, blue building to the north of it. Enter the white building, which is
the Armor Shop, first, just to browse. There is the option to repair your
armor, but since you don't have any yet, look at the proprietor's selections.
Again, I would hold off on purchasing anything just yet, since some of the
cheaper types will eventually be almost useless, and you'd be better off saving
up for higher-quality protection. It's good to have an idea of how much you
will be wanting to save up, however.
Leave the Armor shop, but before you go north into the Training Center, make
sure that time has "stopped" - you can no longer receive any more allowance and
stocks will no longer change. Find your cash-cow hot spot from earlier and
wait to see if you get any more; if not, then there isn't much to do but go
train (by the way, once you complete a mission, you'll be able to repeat the
process of standing in certain areas to receive more cash). If you're feeling
confident with what you have, you may even want to invest or take a class
before you undergo your training. I'd actually recommend taking a class, since
you can only take one a day, and might as well use the time. Whenever you're
ready, enter the Training Center.
Before you can undergo your first lesson, you will have to take a
small quiz on the parts of a Wasp Mech. Using your instruction manual,
answer the three questions correctly to proceed.

The objective of your first training mission is to familiarize
you with a 'Mech and the training grounds. You have to choose
a 'Mech and pilot it to the far southeast corner of the training
grounds and return. You will be judged on a pass/fail system
determined by the time you take to complete your mission. Go
on as straight a path as possible, but walking through forests
and lakes will slow you down. Choose the fastest 'Mech for the
best chance of succeeding. Good luck! |
After your mission briefing, you'll have the choice of a Wasp, Locust,
or Chameleon BattleMech. The Chameleon is the heaviest-armed, but
slowest, while the Wasp is lightly armed and armored but fast. Even
more so is the Locust, so that's probably the best choice for the
mission. It's a pretty straightforward mission, and you should have
no trouble completing it. Run east a few steps, then south through
the clearing in the nearby forest. Now, run southeast as fast as possible
to the small lake in the southeast corner, and you'll get a message
that you should return to where you started. Head west (try to avoid
the water), then northwest as soon as you are past the lakes, and
you should be back in no time at all. Congratulations!
Your instructors will inform you that they will be readying your next lesson,
and that you are to return whenever you are ready. Now would be a good time to
wait and get some more cash, invest, take a second combat class, etc. If you
decide to do the latter, it is my opinion that it is better to be very skilled
in one area, rather than be mediocre at several things. In other words, take a
class in the same subject as you did before, although the price should have now
risen from 75 to 200 C-Bills. Again, I wouldn't specialize in ineffective arms
such as bows and blades. Whenever you are done running your errands, head back
to the Training Center, where you will probably have to take a second quiz on
BattleMech parts. Once again, answer three questions to proceed.

Your second training mission is only slightly more complex.
Somewhere on the field is a piece of rubble. Choose a 'Mech,
go out there, find the rubble, pick it up, and bring it back.
There is no time limit on this mission. |
Sounds simple enough, doesn't it? Look over the briefing carefully,
however. Two things should catch your eye: first, you need to be able
to pick up the rubble. Second, there is no time limit. In other words,
you don't need the fastest BattleMech available (the Locust), especially
since it doesn't have any arms and can't pick anything up! Choose
either the Wasp or the Chameleon, then run around the grounds looking
for the rubble. It can be in many different places, but just look
for a gray/blue anchor-like object and walk over it to grab it, before
heading back to the Training Center. Good work. If you go into the
menu and "inspect" your character, you may have noticed that your
Piloting skill may have increased!
Once again, you have some free time before your next lesson. As usual, check
your investments, take a class, whatever you need to do. The third-tier level
of a certain combat class costs a whopping 325 C-Bills, however, so hopefully
your investments are doing well. I was actually able to take a second class
before the next training mission as well, although this one cost another 450
C-Bills. At this point, you should be rated "Excellent" in your weapon of
choice (please tell me you didn't pick Bows and Blades!), if you've taken four
of them. If you really wanted to, you could take four classes in each of the
three subjects available, although this can get quite expensive and is not
necessary. When all your errands have been taken care of, head back over to
the Training Center and take another BattleMech parts quiz to proceed. This
time, however, the commandant of the Training Center will tell you to go get
some rest.
Head all the way back to the Barracks (in the northwest corner) and enter.
Choose the option to "catch some Z's," and you'll have quite an interesting
dream. Unfortunately, it gets interrupted before its thrilling conclusion, as
an announcement for you to report to the training center blares over the
loudspeaker. Exit the barracks, then go run some errands if you like - there
isn't any rush to get back to training, really. Whenever you're ready, head
back to the center and take another quiz.

By now, you're pretty good at walking around. It's obvious you
have increased your piloting skill. We're going to see how you
handle using your weapons. We've put a worthless Locust shell
on the field for you to pummel. It can't move or fire, so you're
perfectly safe. Choose your 'Mech and go plaster it! |
Again, the Chameleon is the best-armed of the available BattleMechs,
so that is a good choice. Of course, feel free to use either the Wasp
or Locust as well, since you won't be taking fire during this mission.
As soon as your 'Mech starts up, you'll be given the option of letting
the computer fight for you. I like to do it myself, but if you wish,
go ahead and let it. Since this is your first time being in battle,
the combat interface might seem a little strange to you. If you need
to, read the Game Basics section above for a little more information
on how it works. I simply set all my weapons to fire at the Locust
(which should be to the east), then start walking/running in his direction.
As soon as your weapons get into range, they should start firing.
Note that you seem to hit quite a bit better if you're not moving.
It shouldn't take long for the Locust to be destroyed, so head back
to the center.
You have some more free time to spend as you wish. Head back to the Training
Center when you are ready for your next lesson (you have to take another quiz
first, of course).

It's time to see how you respond to a reactionary opponent.
We've rounded up a group of old labor robots and outfitted them
with rudimentary intelligence and a variety of weapons. Your
mission is to go out there and eliminate them without getting
your 'Mech shout out from under you. |
Again, I'd recommend using the Chameleon. Scan for enemy units, and
you should see about five ground troops to the east. Now, since each
of your weapons have more than enough firepower to take one of these
troops out, don't set all of your weapons to a single target. Instead,
set each one to a different troop - with smaller weapons such as the
machine gun, however, go ahead and set more than one. Of course, you'll
want to focus on the ones that are most heavily- armed (i.e. with
an inferno), which you can discover by scanning. If you're feeling
especially bold, you can simply step on them, rather than relying
on your weapons!
You should be used to the drill by now. Go check your stocks, take a class or
two, etc. before returning to the Training Center for yet another quiz and
mission:

Welcome to the big time: combat against another 'Mech. You will
be engaging a remote-controlled Locust in a one-on-one situation.
Use your training and skills to best your opponent. You will
pass this test if you destroy the enemy while your 'Mech is
still standing. By the way, we've disabled your combat computer
for this mission. If you're going to win, you'll have to do
it yourself. Good luck! |
Start by scanning for the Locust, to discover its general location.
Set all of your weapons on it, then move in that direction. Move your
Chameleon into the forest if you wish, for more cover, but be wary
of any fires that may start, as they can easily overhear your BattleMech.
In fact, this may be a strategy that you will take advantage of for
the rest of the game, as it will save your 'Mech from taking as much
damage as it would out in the open. It shouldn't take long to complete
the mission. When you're done, a fellow cadet by the name of Rick
Atlas congratulates you and invites you to meet him at the Lounge
later.
Since this isn't something that happens very often in this game, it probably
means that you definitely want to go! Start heading over there (it is to the
west, just north of the Mechit-Lube), then enter and select the "talk to
others" option to see Rick there. While the two of you are hanging out, a Tech
comes over to pick a fight. Your new friend will step in, but not before you
experience a little berating at the hands of the Tech. Before Rick leaves, he
hands you a small electronic device. Go do whatever errands you need to do,
then head back to the Training Center. Remember to save before you enter!

Now we're going to have your toughest test yet: you will have
to face more 'Mechs than you have previously. Get ready for
the fight of your life! |
Pick the Chameleon again. If you happen to get some strange messages
(you will know what I mean), skip down below to the next mission.
This is another one of those times where an event occurs at a random
time. If it seems like just another training mission, continue on.
One thing to note about fighting multiple 'Mechs: it is probably better
to focus all your weaponry on one first, to destroy it as soon as
possible before focusing on its companions. Now, this might sound
a little strange, but you may WANT TO FAIL the mission. Why? Well,
inspect your character. You'll notice that his Gunnery and Piloting
skills aren't that high yet. Now, if you keep failing and replaying
the mission, they will keep going up, and you will be able to get
Excellent marks for both of those attributes!
Whether you care about this or not, finish the mission, then make sure to go
and take all the classes you want to but haven't taken yet, including the Tech
apprenticeship. If you still have some extra money lying around, you may even
want to go buy some armor and a decent weapon. Enter the Training Center, take
another quiz, and then you'll get the same briefing as the last mission, even
though the enemies will be more numerous...

Now we're going to have your toughest test yet: you will have
to face more 'Mechs than you have previously. Get ready for
the fight of your life! |
As I mentioned above, a certain event may happen on this mission, and you will
know by some messages that you receive as it starts. Otherwise, you'll have to
face three Locusts! This may take several tries, especially if they all gang
up on you at once. I find that by moving to the northeast, into the forest,
they oftentimes move out from behind the building one behind the other, making
it easier to destroy the closest one before focusing on the next. Keep at it
until they are all dead, do your errands, then return to the Training Center.
If you've gotten this far and still haven't encountered the event I'm talking
about, then you will almost certainly get it now. Make sure you save before
entering!

Now we're going to have your toughest test yet: you will have
to face more 'Mechs than you have previously. Get ready for
the fight of your life!
NOTE: You will get a new message as soon as the mission starts:
"These 'Mechs are unlike any you've fought against. You feel
uneasy." |
Before I continue, I'd also like to point out that you can choose
any of the three 'Mechs for this mission. Even though you don't want
to be getting into much combat, as your 'Mech will almost certainly
be destroyed, I like to pick the Chameleon, for one main reason: this
is the only place you'll be able to get one! Later on in the game,
you'll be able to find Wasps and Locusts much easier.
Anyway, you'll soon discover that these are House Kurita (Draconis Combine)
enemies that are invading and actually trying to kill you! Now, I like to hang
out near the Training Center, trying to hide. As soon as the Academy has been
destroyed, run north then west, then northwest again toward the exits, avoiding
any damage or confrontations if possible. With the Chameleon, I like to
alternate jumping with running to get away as quickly as possible.
Hopefully, you followed my advice and saved before the mission, so that you can
reload your game if your BattleMech is destroyed. Of course, you could always
continue on with the game on foot, since you'll find more 'Mechs later, but I
like to have one right at the start. Escaping can be quite difficult, as much
of it depends on luck, but keep trying and you should make it. As soon as you
get a little bit outside of the gates, you should get the message that you
have eluded your enemies!
Apparently, Kuritan 'Mechs have made a lightning raid on Pacifica
and have destroyed the Citadel, as well as most of your fellow soldiers.
Overhearing the few remaining survivors, you hear of rumors that your
father may have been killed! Since there is nothing left of your home
of the last nine years, your only hope is to make way for the Starport,
meet up with any friends that may still be alive, discover the fate
of your father, and get off of the planet. Pull up the main menu and
sneak a peek at the overhead map. The Starport is to the north-northwest,
so go ahead and start heading in that direction. It's a bit of a hike
(especially if you're on foot, but even if you're on a 'Mech), so
go ahead and change your movement rate as well, if you wish. You may
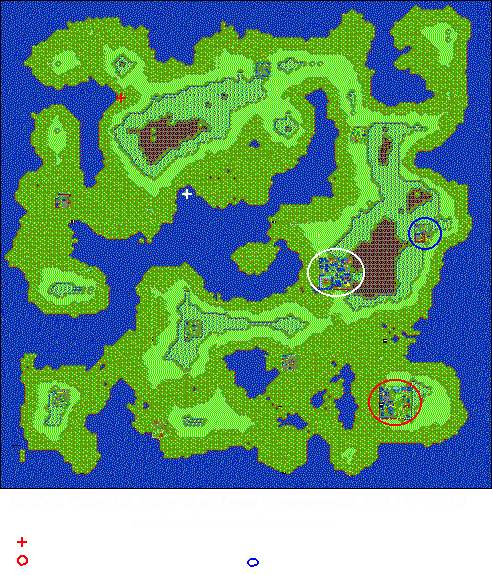
also wish to refer to the map in the Appendices below, if you are
having trouble locating any cities, landmarks, etc.

While traveling to the Starport, you will almost certainly encounter Kuritan
enemies, but they shouldn't pose much of a threat, unless you're on foot. Kill
them if you can, but your priority right now is to make it to your destination
in one piece, so flee if necessary. Again, this would really be much easier if
you had escaped with a BattleMech. Switch out your weapons for any that the
Kuritans drop if necessary and continue on your way. Eventually, you'll come
across a large, thick forest, meaning you're pretty close. Wander around until
you can spot the gated walls of the city, then make your way around to the west
side, where you will find the Mech Garage - go ahead and enter.
Well, you made it here safely, but it's still a pretty unfamiliar area. In
addition, dressed in your clothes from the Academy, you're an easy target for
any hostile forces, so one of the first things you'll need to do is find a
change of clothes. Once you've parked your BattleMech, start walking southeast
toward the white building, then head directly east past it and a blue building.
Just north of a lake and some structure with a blue orb on top is a small white
building, which you should enter. This is the Clothes Shop, so purchase a new
outfit for 35 C-Bills. You should have more than enough to cover this expense,
but if not, simply walk around and kill a few enemies to make some quick cash.
Now that you can walk around a little bit more anonymously (you will still be
spotted occasionally), head to the southwest. Near the large arena are two
more white buildings; the one to the west of the arena is an Armor Shop, while
the one to the north of it is the Weapons Shop. Buy whatever you might need,
because you'll have to do a little ground combat in a short while. If you can
afford either of them, the SRM Launcher or Inferno will absolutely obliterate
any enemy ground troops.
Another thing you can try doing is visiting the Mechit-Lube, directly
to the west of the Weapons Shop. Here, you can get your BattleMech
repaired, reload on its ammunition, or even upgrade it! Note that
Chameleon's cannot be tinkered with, but they still pack quite a punch
nevertheless. If you're still short on money (i.e. your investments
are doing poorly), you can also try fighting in the arena. Note that
the enemy 'Mech you will face is randomly generated, and sometimes,
they can be too much to chew. You only win 250 C-Bills for winning,
so make sure that the cost of repairing your BattleMech is not more
than that. Even worse, some 'Mech parts, such as the engine, cannot
be replaced!
Your eventual goal is the Inaugural Hall, which in the east side of the
Starport, just north of the Hospital in the southeast corner. Of course, there
is no time limit right now, so feel free to wander around and explore the city.
The Hospital is a good place to visit; inside, you can search medical records
and look for your father, although you won't find any new information. You can
also get healed, if necessary. I would strongly recommend attending a medical
seminar at the Hospital, even though the price is a staggering 500 C-Bills, as
it will allow you to heal yourself a bit more competently. Once you have taken
the class, you'll have the new option of buying a Med Kit for 75 C-Bills, which
will definitely come in handy. Leave the Hospital and head to the northeast
corner, where you will find the ComStar Station.
Do whatever you need to do with your stocks, then exit and head west. You will
probably have to make your way south to get around some obstacles first, but in
the northwest corner of the Starport is a shop called the "Video Hut." Inside,
you can buy such electronics as a Terrain Mapper (6000 C-Bills) or a Holodisk
player (7000 C-Bills). Yes, the prices are outrageous, but the Terrain Mapper
can come in very handy when you can afford it later. Hold off on buying a
Holodisk player, however, as there are a couple of them around that you can use
free of charge later. If you browse and check out the player, it'll mention
that you had one back in your Barracks at the academy.
Continue walking around the Starport, or even outside of it, if you wish. Note
that it costs 150 C-Bills to get your 'Mech out of the garage, however! When
you are ready to proceed, head back to the Inaugural Hall, on the east side of
the city. Inside, you see the walls adorned with the banner of House Kurita!
Apparently, they have taken over and are instituting the new government in this
very building, tonight. You have a little bit more free time, so wander around
for a little while longer before heading back inside.
The party should have just started. Sneaking in, you'll look for any familiar
faces, but are quickly dragged out by someone much bigger and much better at
fighting than you are. Once outside, your assailant drags you down a side
alley, before asking you to take a closer look at him. It is Rex Pearce, a
friend of your father's, and a member of the Crescent Hawks. The Crescent
Hawks are an elite group formed by Katrina and used for covert operations, and
Rex identifies himself as a member by showing you a holocard. Realizing that
you saw that insignia on your father's equipment long ago, you are then given a
strange box that your father entrusted to Rex to give to you. Apparently, your
father was also guarding a huge cache of invaluable 'Mech repair parts, and
that must be what the Kuritans are after. To enter the cache required the
retinal scan of Rex (in other words, do NOT let him die!) and a password from
you (hidden in the box).
Now, your task is to gather up the remaining Crescent Hawks, find the cache,
and signal Katrina once you have done so. One of the aforementioned agents has
been imprisoned, so you should make an attempt to free him later; of course,
you will also have to be on the lookout for Kuritan double agents. Just as you
are about to open the box, however, you and Rex come under attack! If you are
at least decently armed and armored, the pair of you should be able to take out
the three enemies relatively easily. Go ahead and inspect Rex, and you will
see that he is an excellent BattleMech pilot and gunner (he even has his own
Commando 'Mech), and that he is rather skilled with a pistol. Nevertheless,
you may want to buy him an SRM Launcher or Inferno, as well as some good armor.
When you are done making preparations, head back to the Mech Garage, where you
first entered (just north of the Mechit-Lube). Actually, before you even do
so, note that the Commando is rather underpowered as-is. If you check the
Appendices below, you'll see that it is armed with only a Medium Laser and two
Short Range Missile launchers. If you visit the Speed Shop in the Mechit-Lube,
you can upgrade it for a hefty 13,800 C-Bills. For that price, the Techs will
take off the small missile launcher, replace it with a couple of medium lasers,
then add a ton of armor. Of course, doing so is up to you, but it will
certainly improve the 'Mech. You can also have Rex take an apprenticeship as
well, increasing his Tech skill from Amateur to Adequate. Now, go ahead and
enter the Mech Garage, paying 150 C-Bills to get your rides out.

Make your way around to the northeast corner of the Starport, then head to the
east and just a tad bit to the north. Just a short while after you cross the
large field of rocks, you should come upon another city. Most likely, you will
have faced a few BattleMechs on the way here, so stop by the Mechit-Lube for
repairs, if necessary. Of course, if you trained Rex up, you should be in
very good shape still. In the southwest corner of this small city is the jail,
in which one of the Crescent Hawks is being held. Enter the jail, then ask
about Rex's friend. One thing to note is that this particular Crescent Hawk is
random. That is, he may be a Tech or Doctor, for example, he may be named one
of several names, and he may or may not be a Kuritan double agent.
In the case of the latter, you will know he is as soon as you enter combat, as
he will betray you. Of course, if you put him out on the ground, outside of
either of your two BattleMechs, he shouldn't be much of a problem at all. At
any rate, after asking about him, you are granted visitation rights. After he
identifies himself as a Crescent Hawk, Rex springs into action and knocks out
the jailkeeper. Now, you have a couple of options. Edward (your guy may be
named differently) also has a BattleMech, in the impound lot, and you decide
whether or not you should try and commandeer it. Note that if you don't do it
now, you won't get another chance, so you should definitely make a go of it.
If you agree to go get it, you will have to quickly run, on foot, to a line of
BattleMechs standing nearby. Quickly run up to each one until you find the one
that starts up.
Once you've acquired the Stinger BattleMech, the escape is successful! Now,
you have to assign each of your pilots to one of the three BattleMechs.
Unfortunately, this is not always so simply. If the guy you sprung is a double
agent, you will receive a message that you feel uneasy about putting him behind
the controls of a 'Mech. Hopefully, this isn't the case, and you'll be fine.
However, if he is indeed the traitor, you are now faced with the task of having
to destroy his 'Mech the next time you are in combat. It's not that this is
difficult; it's just a waste of a good BattleMech. So, I like to reload an old
saved game, from before you sprung him out of jail. Then, find another
Crescent Hawk that is capable of piloting a 'Mech, before heading back to the
jail. Simply skip the jailbreak, continue on in the walkthrough below, then
jump back up to this section whenever you find another pilot.
Remember that Holodisk you were about to view with Rex, just before the enemies
started shooting at you? Head south, all the way back to your old Barracks.
As soon as you enter, you'll view the Holodisk - unfortunately, it was damaged
during the melee, and part of it is unwatchable. Sadly, the fact that you are
watching the video means that your father is dead. Jeremiah goes on to tell
you that he, in conjunction with Edward Tellhim (remember him from the Citadel
museum?), designed a series of safeguards to protect the Star League cache.
This is especially important, as the cache contains not only repair parts, but
documentation that could restore much of the technology that was lost in the
Succession Wars. The damage to the video is too extensive, however, and the
rest of the Holodisk is lost to you - and with it, the password! Rex suggests
that you should look for more of the Crescent Hawks, and then find Tellhim, as
he may be able to repair the disk. Well, let's get started.
Head north from the ruins of the Academy, until you are about halfway
in-between it and the Starport. Start heading directly west, and you should
come across another small town. One of the small, gray buildings in the
southwest corner of this town is the Mayor's House, which you can break into.
This isn't necessary, however, unless you want to read the newspaper or watch
your Holodisk, but you've already done that. If you had watched it here, you
would have ended up getting slightly hurt. Not badly, but I still prefer to
watch it back at your old Barracks. Anyways, check out the Hospital, and try
searching the medical records.
Most likely, another Crescent Hawk will introduce himself and show the insignia
marking him as an ally. Note that if you participated in the jailbreak before
and found that that particular agent was trustworthy, this one might turn out
to be the traitor, so be cautious. The opposite is true as well: if the guy
you sprung from the jail was the traitor, this guy is trustworthy. Since he
is a doctor, you may want to sign him up for another medical seminar to even
further increase his skill. Of course, you'll want to buy him a Field Surgery
Kit (375 C-Bills) to make the best of his talents. Remember, there is also the
possibility that he may not even show up here, so you'll have to continue
looking around other town hospitals for him.
Unfortunately, my doctor wasn't able to pilot a 'Mech, so I still have to find
someone able to, before I can head back to the Jail and grab the Stinger 'Mech.
Of course, you don't want to leave him outside on the ground, as an enemy 'Mech
could simply step on him and kill him in seconds. Head northwest from this
town until you reach the forest, then change your bearings to directly west.
It shouldn't take long before you come to another small town. There is another
Hospital here, in case you didn't find your doctor in the last town. Make sure
to check the Mechit-Lube as well, in case another Crescent Hawk is there.
When you've thoroughly explored the town, start heading directly south. After
you cross over the large field of grass, you'll come across another forest.
Here, turn west, and you should discover yet another small town. This town
features a Movie Theatre, in which you can pay 5 C-Bills to catch a flick. It
isn't really worth it, however, as the film soon breaks. Interestingly enough,
the scenes from the movie look exactly like the outtakes that you see while you
are in battle! Anyway, your main goal in this town is, as with the other ones,
to search the Hospital and Mechit-Lube for fellow Crescent Hawks. With any
luck, you may find someone. If not, head toward the next town.
Start heading northwest until you reach the coastline, then start making your
way around. Once you can start following it south again, head directly west to
find another town, in the forest. You know the drill: check the Hospital and
Mechit-Lube for allies. If you haven't figured it out already, we're pretty
much going to be scouring all of Pacifica's towns for any allies we can find.
This town was the last of the ones in the south, so go ahead and change your
movement rate to four steps and hike all the way back to the Starport. From
the northeast corner of the Starport, head directly north for awhile, until you
arrive at the next town. Check the Hospital and Mechit-Lube as usual, then
when you are ready, start heading northwest, until you are about in the middle
of the forest.
Proceed directly westward, and you should come across another small town. As
usual, explore it fully, then proceed southwest. You may come across the
Inventor's Hut, where Tellhim resides, but don't bother going in yet - you will
not be able to get in. Keep heading in that direction, and you should spot a
final town. This one actually has a ComStar Station in its northeast corner,
so go ahead and check your stocks. Hopefully, you'll have amassed a fortune
by now. Now, by this point, you will have checked all of the towns for allies,
and should have at least four members (including you) in your party, with the
Kuritan double agent already dead. If this is not the case, head all the way
back to the Starport and check there again for more. Your party should consist
of you, Rex, at least one Tech, and at least one Doctor; make sure this is the
case. Hopefully, you'll have three BattleMechs as well, but two will suffice.
Don't forget to train everyone up in their respective professions, especially
the Doctor and Tech.

Now that you've reassembled the Crescent Hawks, it is time to speak with Dr.
Tellhim, in hopes of him being able to repair your damaged holodisk. Earlier
in the walkthrough, while you were moving from city to city in search of allies
to join your party, you may have encountered a small building called the
Inventor's Hut. If you didn't, however, jump down to the map below (Keyword
kw-map) and look in the northwest area of Pacifica. Start making your way over
there, but if you are having trouble locating it, simply follow the northern
coastline, which should take you right to it.
Enter upon arriving, and you find that appearances are misleading. What looked
like a dilapidated hut from the outside is actually quite opulent inside.
After your party searches around for a bit, it will come across a hologram of a
large face. You are then faced with a test of sorts: get a question wrong, and
you will be expelled from the premises. This is why it is imperative that you
have at least one Tech and one Doctor in your party, and that they are trained
as much as possible in their respective professions. Your party members will
easily answer the questions that are posed, until the face finally starts
pestering you about your father. It isn't until you pull out your submachine
gun (wait a minute, I'm armed with an Inferno...) before Tellhim finally shows
his true self.
Tellhim explains that he didn't know of your father's demise, and was only
asking about him because Jeremiah still owed him some steaks and cash. He then
repairs your holodisk, before allowing you to view it in privacy. When asked
where the Star League cache is, Tellhim replies that it is relatively nearby,
in a cave to the southeast (look at the map below, if you don't want to waste
time searching). The cave is on a small island, not the mainland, by the way.
Head over to it and enter.
Get ready for the most mind-numbing, frustrating part of the game.
Actually, you will probably be spending more time in this segment
than you have in the whole game thus far! You find yourself in a large
maze, with eleven doors that you will have to eventually open. Each
door requires that you imprint your keycard with a red code, a blue
code, and a green code. For instance, a door may require Red 1, Blue
2, Green 3. Thus, you'll have to work your way around the maze until
you find the right codes to imprint on your keycard; of course, the
door won't tell you which code you need - only whether or not is correct
or incorrect. Let's begin, shall we? I'll give a detailed walkthrough
of where to go to get the correct codes, but if you prefer to simply
know which codes are needed, see the table and map below:
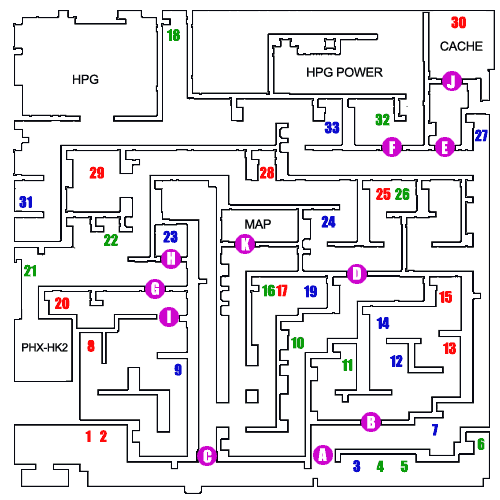
| Door |
Red |
Blue |
Green |
| A |
01 |
03 |
05 |
| B |
02 |
07 |
18 |
| C |
15 |
14 |
11 |
| D |
13 |
31 |
04 |
| E |
25 |
33 |
10 |
| F |
28 |
24 |
16 |
| G |
29 |
12 |
06 |
| H |
20 |
27 |
22 |
| I |
17 |
19 |
26 |
| J |
08 |
09 |
21 |
| K |
30 |
23 |
32 |
|
 |
| |
Move in and start heading around to the right, passing two computers
in the corner. Run into the left computer, and imprint your keycard
with Red 1. As you move down the east corridor, you'll pass a door
to the north. Go ahead and run into it, and you'll see that each of
your color codes are incorrect. Go ahead and continue heading eastward,
until you get to a second door to the north. Run into it, and you'll
see that your Red code is correct! Continue east past this door and
hit the first computer beyond, picking up Blue 3. Walk east, passing
another computer, then hit the one just to the right of it, to get
Yellow 5. Head west back to the door you just passed, and it should
now open. One down, "only" ten to go.
Before you proceed through the newly-opened door, head all the way back to the
entrance of the cache, then hit the computer you ignored before, picking up Red
2. Turn right back around and go through the door you opened, then head east,
past another door to the north. Hit the nearby computer to imprint your
keycard with Blue 7, before heading further east. The corridor should then
turn north, so follow it around, ignoring the first west turn you come to. Do
take the second left turn, however, then walk past two doors to the north.
Head north, then west (ignore the computer to your right). When you get to the
next north passageway, with a nearby sign reading "Hyper-Pulse Generator," go
up to the end of it and imprint your keycard with Yellow 18. Good - now, run
all the way back to where you opened the first door, making sure not to imprint
your keycard with any different codes. You should now be able to open the
door slightly northeast to the first door you opened.
Head through the door you just opened, then take a right, before heading north
again. Ignore the first computer you pass, then hit the second one, in the top
right corner to get Red 15. From this computer, head south and then west, the
first chance you get. Hit this next computer to imprint your keycard with Blue
14, before heading south from this terminal. When you get back to where you
opened the door, head west, following the corridor around to the north. There
is only one computer here, which you should use to imprint your keycard with
Yellow 11. Now, head south and then west, all the way back to the first door
you passed, right after entering the cache. The door should open freely now.
Alright, we're making a little bit of progress. Don't go through the door you
just opened, but instead, go east, and then back through the first two doors
that you opened. Take a right turn, then hit the first computer on that side
to get Red 13. From that terminal, go back south through the last door, then
head east. Go north all the way back to the sign reading "Hyper-Pulse
Generator," near where you got Yellow 18. Instead of going up to where that
computer is, though, continue westward until you get to the southward turn.
Go down this way, and there should be a terminal on the left, with Blue 31.
Now, hike all the way back through the first door that you opened (you should
be in the southernmost part of the maze). Head east, and the second terminal
you encounter should have Yellow 4. As soon as you've imprinted your keycard,
head west until you get to the last door you opened, then go north through it.
Take the first right that you can, and then south as soon as you can. Follow
the corridor all the way around, as it turns back north, and you'll eventually
get to another door (D), which you should be able to open.
Go through the door, turn right, then head north. The terminal on the left
should give you Red 25. Head back down to where you came from, through the
last door that you opened. The first terminal that you come to on your way
back to the start of the maze should be Yellow 10, which you should imprint
your keycard with. Continue on toward the southernmost corridor, then head
east and then north through the first door you opened. Head east, then north,
once again in the direction of the Hyper-Pulse Generator. After heading
through the westward corridor with the two doors, however, take the first right
and imprint your card with Blue 33. From here, head south, then east through
the corridor that you just went to. Open the second door (on the right).
Hike all the way back to the third door (C) that you opened, near the entrance
to the maze. Go north through it, take the first right, then go east through
the four-way intersection. Head north, and you should come to a bank of three
computer terminals. Hit the leftmost one to imprint your keycard with Yellow
16. Now, head south, west, then south the first chance you get. From here, go
east, then north until you go through the fourth door (D) that you opened. As
soon as you pass it, take the left turn and follow the corridor around. Hit
the terminal for Blue 24, then continue forward in this corridor until you see
Red 28. Again, you'll have to do some backtracking. Go all the way back to
that corridor with the door that you just opened (E), then open the door just
west of it.
On to the next door: don't even bother going through the newly-opened one just
yet. Head east, then south, then west until you get to the second door that
you opened (B). Go north through it, then take a right and imprint Blue 12 on
your keycard. Head south through the first two doors that you opened, until
you are back in the southernmost corridor. Walk all the way to the east and
imprint your keycard with Yellow 6. Move west until you get to door C (closest
to the entrance), then move north through it. Take the first right, then the
first south, before following the corridor as it moves to the east and then the
north. Head through door D, then take the left turn. Walk past both of the
computer terminals that you used earlier, through the westward corridor. A
small room to the west after this corridor has a lone computer terminal, with
Red 29. Imprint it onto your keycard, then move east out of this room and then
south. Just to the east are two doors: one to the north and one to the south.
Door G, to the south, should open easily to your keycard.
Despite the long distances we're having to walk, things should be getting at
least a tiny bit easier, since we've used many of the terminals by now. Go
through the door that you just opened, then head west and imprint Red 20 onto
your keycard. Now, go back through the last door and head a tiny bit west and
then north, to get Yellow 22. Blue 27, which we need for the next door, is
quite a distance away. Make your way all the way back to the southernmost
corridor, where you started, then head east and walk north through the first
door that you opened (A). Head east as soon as you do so, then go north all
the way to the dead end, bypassing the two left turns, with the terminal in the
nook. As soon as you imprint your keycard, move all the way back to the last
door that you opened (G), and use your keycard on the just north of it.
Again, there's not much of interest behind this door (at least not yet). Head
west, north, then east, toward door D. You should be on the left branch right
after this door. Instead of heading south through the door, take the right
branch, and you should find a small room with two terminals a bit to the north.
The one on the right has Yellow 26, which you should imprint. Now, head south,
through door D, in the general direction of door C. When you get to the four-
way intersection, take the path to the east, which soon leads north. Inside
the room with the bank of three terminals, imprint your keycard with both Red
17 and Blue 19 (you got Yellow 16 in here earlier, for door F). Now, make
your way south and then east again, before heading north through door D. Take
the west turn, moving toward the last door that you opened. South of that door
and south of the door that you had opened just before that one is the next one
that you can open.
Head south through the newly-opened door and then west. Imprint your card with
Red 8, then walk just a tad bit east to imprint your keycard with Blue 9. Now,
go north through two doors (I and G), before heading west to grab Yellow 21.
While these particular codes were all close-by, the door isn't. Make your way
all the way back to the southernmost corridor, then head east, before going
north through door A. Head east as soon as you do so, then walk north until
you get to the second left turn. Head just slightly west, then north as soon
as you can. Look what we have here: a ladder heading down! Climb down, and
you will discover the hidden Star League cache! There is still one more door
that we need to open, however, in order to finish our mission.
Right next to the ladder is Red 30, which you should imprint on your
keycard. Move south through two doors, then head west, before taking
the first corridor northward. The terminal in here should give you
Yellow 32. Now, start heading all the way back to door I (the one
you opened just before the door leading to the cache). Before I forget,
head to the far west wall, near where you obtained Yellow 21. Start
moving south along this wall, even though it looks like a dead-end.
However, if you just keep walking south, you'll discover a secret
passageway! At the end is your father's Phoenix Hawk BattleMech; now
why couldn't we have been able to use that beauty during the game?
Finding the 'Mech here gives you new hope that perhaps your father
isn't dead after all. Head north again, then east, before going north
into the small room with the lone computer. Imprint Blue 23 on your
keycard, and the last door is ready for you to open. You need to head
all the way back to the four-way intersection that we keep walking
by (near door C), then take the northern passageway to the final door.
Enter the room and climb down the ladder to the east, to find yourself
in a large map room.
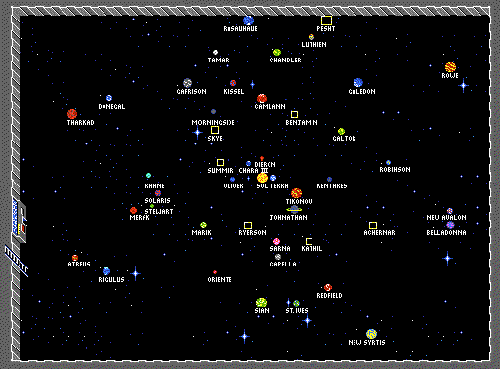
If you recall from earlier, you are supposed to use the map that your
father gave you to figure out this next puzzle. If you've been using
a high movement rate, you may want to change it back down to one step,
as bumping into the wrong planets will mess it up. Carefully make
your way to the northeast corner of the room, looking for a planet
named Pesht; walk over it, and it should turn into a square.
Being sure not to bump into any other planets, move south and slightly
west, to do the same thing to Benjamin. From there, head
west to Skye, then south to Summer. The path south
is rather crowded, so head east a little bit, before moving south
and back to the west, to hit Ryerson. Move to the east, then
walk over to Kathil and, finally, Achernar.
As soon as you have hit all seven of these planets (and no others), make your
way over to the west wall of this map room. Adjacent to the ladder is a
control panel, which you can now use to contact Katrina. You can now trigger
the Hyper-Pulse Generator, which is upstairs, so climb back up the ladder. To
get to the power room, walk all the way to the southernmost corridor, go east,
north through the first door you opened, then east again. From there, move
north, take the second left, and then the second door to the north. Simply
walk into the control panel on the west side of this large room to turn on the
power. Finally, head south out of this room, and then all the way to the west,
where you should find the Hyper-Pulse Generator. Simply head up the stairs in
the northwest corner, and you'll automatically call Katrina.
A heavily-armed dropship flies in to load up the invaluable parts, holding off
the Kuritan forces. Katrina has one more message to give you: she is offering
you the rank of Lieutenant in the Lyran Commonwealth Armed Forces! As hard as
it is for you, you decline the offer, as you must instead focus your attention
on discovering the fate of your father. Katrina gives you full permission,
allowing your party to act independently as the Crescent Hawks. Jason and his
fellow companions then board the dropship, their mission only beginning.
Congratulations, you have beaten BattleTech: The Crescent Hawk's Inception! |